 Arabic
 Chinese
 French
 German
 Hebrew
 Italian
 Japanese
 Portuguese
 Spanish
Edit Menu
Undo/Redo
Reverts recent changes you’ve made to the presentation.
Cut
Transfers selected objects to the clipboard, allowing them to be pasted in elsewhere. Use this, for example, to move cues to another position along the timeline, or to other presentations.
Copy
Copies selected objects to the clipboard, allowing the copies to be pasted in elsewhere. Use this, for example, to transfer display configurations or cues between presentations.
NOTE: When transferring cues between presentations in this way, any media associated with these cues will transfer along with the cues, and will be automatically added to the Media window in the target presentation.
Paste
Pastes the most recently cut or copied objects into the current window.
Clear
Removes selected objects without altering the contents of the clipboard.
Select All
Selects all objects in the current window.
Select to End
Applies to timeline windows. Selects all cues from the current time position and forward.
Specifications
Opens the Specifications dialog box for the selected object. This is equivalent to pressing the Enter key or double-clicking the object.
See “2D Display/Projector” and “Cue Specifications” for more details. For media proxy items, see “Add Proxy”.

Move
Moves the selected objects by a specified number of pixels. Applies to cues and displays. When applied to cues, it moves the stage positions of media displayed by the cues.

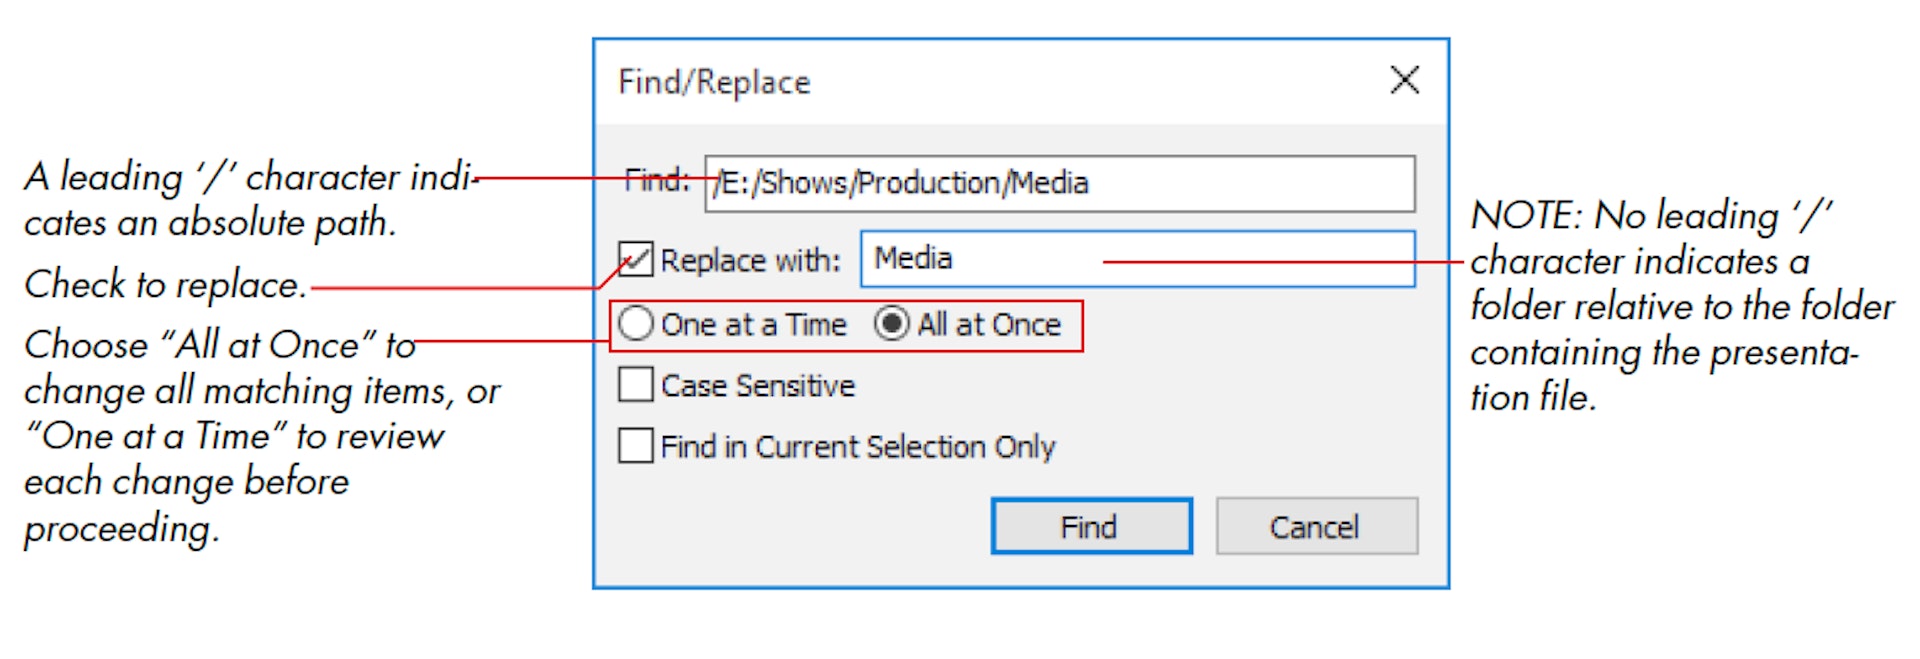
Find/Replace
Finds and optionally replaces specified text. When applied to the Media window, this allows you to locate media items by specifying the name of the media file, or any part of its path name. The command operates on the information shown in the “File Location” column of the Media window, indicating the relative or absolute path to the media file.
You can use the Replace function to update the path to media files after they have been moved to another disk or folder. For instance, if you start out with your media files on a shared server during the early stage of production, you may later want to move all media files into a sub-folder of the folder containing the presentation file. After transferring the files, use the Find/Replace command to change the absolute part of the path name (beginning with a ‘/’ character) to a relative (that is, beginning with the name of a folder located in the same folder as your presentation).
As an example, assume that the media files were stored in a folder named “WATCHOUT/Production1/Media” on a network volume named “E:” during production. You have now copied these files into a folder named “Media” located in the same folder as the WATCHOUT presentation file. You would then enter the following values into the Find/Replace dialog box to update all relevant media paths accordingly.
Finding Cues
The Find command can also be used in timeline windows. In this case, it allows you to search for Control cues by name or media cues by the name of their associated media. The latter is useful in finding cues using a particular media item. The timeline is first searched in the forward direction from the current time position. If not found, it is searched backwards.

Using Quickfind
The QuickFind feature allows you to jump straight to a Control cue by pressing a single function key on the keyboard. Simply name the cues F1, F2, F3, etc, and then press the corresponding function key (see “Using Find and QuickFind”)
Find/Replace Again
Repeats the most recent Find/Replace command.
Snap
When this is enabled, objects exert gravity on each other as they are dragged with the mouse, making them snap together. This makes it easier to align images, cues and tween points.
- When dragged in the Stage window, images will snap to the edge, center or corner of displays and other images.
- Cues will snap to adjacent cues when dragged in a timeline window.
- Tween points snap to other tween points within the same cue, as well as to the beginning and end of the cue.
- Cues and tween points snap to the current time position. For this to work, first turn off “Click Jumps to Time” on the Timeline menu.
HINT: When working in a crowded stage window, it may be hard to see what’s snapping to what. If so, zoom in on the area of interest (see “Setting the Stage Scale”) and disable the preview of layers that get in the way (see “Disabling Layer Preview”).