 Arabic
 Chinese
 French
 German
 Hebrew
 Italian
 Japanese
 Portuguese
 Spanish
3D Models
3D models can be incorporated into your presentation in much the same way as images and video. However, as many 3D file formats only contain the geometric shape of the object, and not its other attributes, a two-step process is involved:
- Drag the 3D model into WATCHOUT. It appears as a white, or multi-colored, object without any clearly distinguishable features.
- Apply images or video to the texturable areas of the 3D object to make it come alive.
The first step is accomplished by dragging a 3D model file into WATCHOUT. WATCHOUT accepts the following common 3D file formats:
- 3DS (3D Studio Max)
- OBJ (Wavefront).
- DAE/Collada.
- BLEND (Blender).
- FBX (Autodesk Filmbox).
NOTE: Due to the wide variety of dialects used in 3D files, some files may not import properly or at all. If so, try exporting your 3D model in a compatible format from your 3D application. Formats that are likely to work consistently are 3DS and OBJ.

IMPORTANT: Models brought into WATCHOUT must have texture coordinates (also known as UV coordinates) assigned in the 3D application beforehand. This is necessary in order to subsequently apply the texture images correctly.
Many 3D file formats don’t use real world dimensions. Instead they use their own, internal “units” to define size and distance. Hence, when bringing 3D models into WATCHOUT, the model’s units must be interpreted into Stage pixels. You can control how this interpretation is handled in the Specifications dialog box associated with the 3D Model in the Media window. This also allows you to control where the anchor position used for scaling and rotation is located within the model.
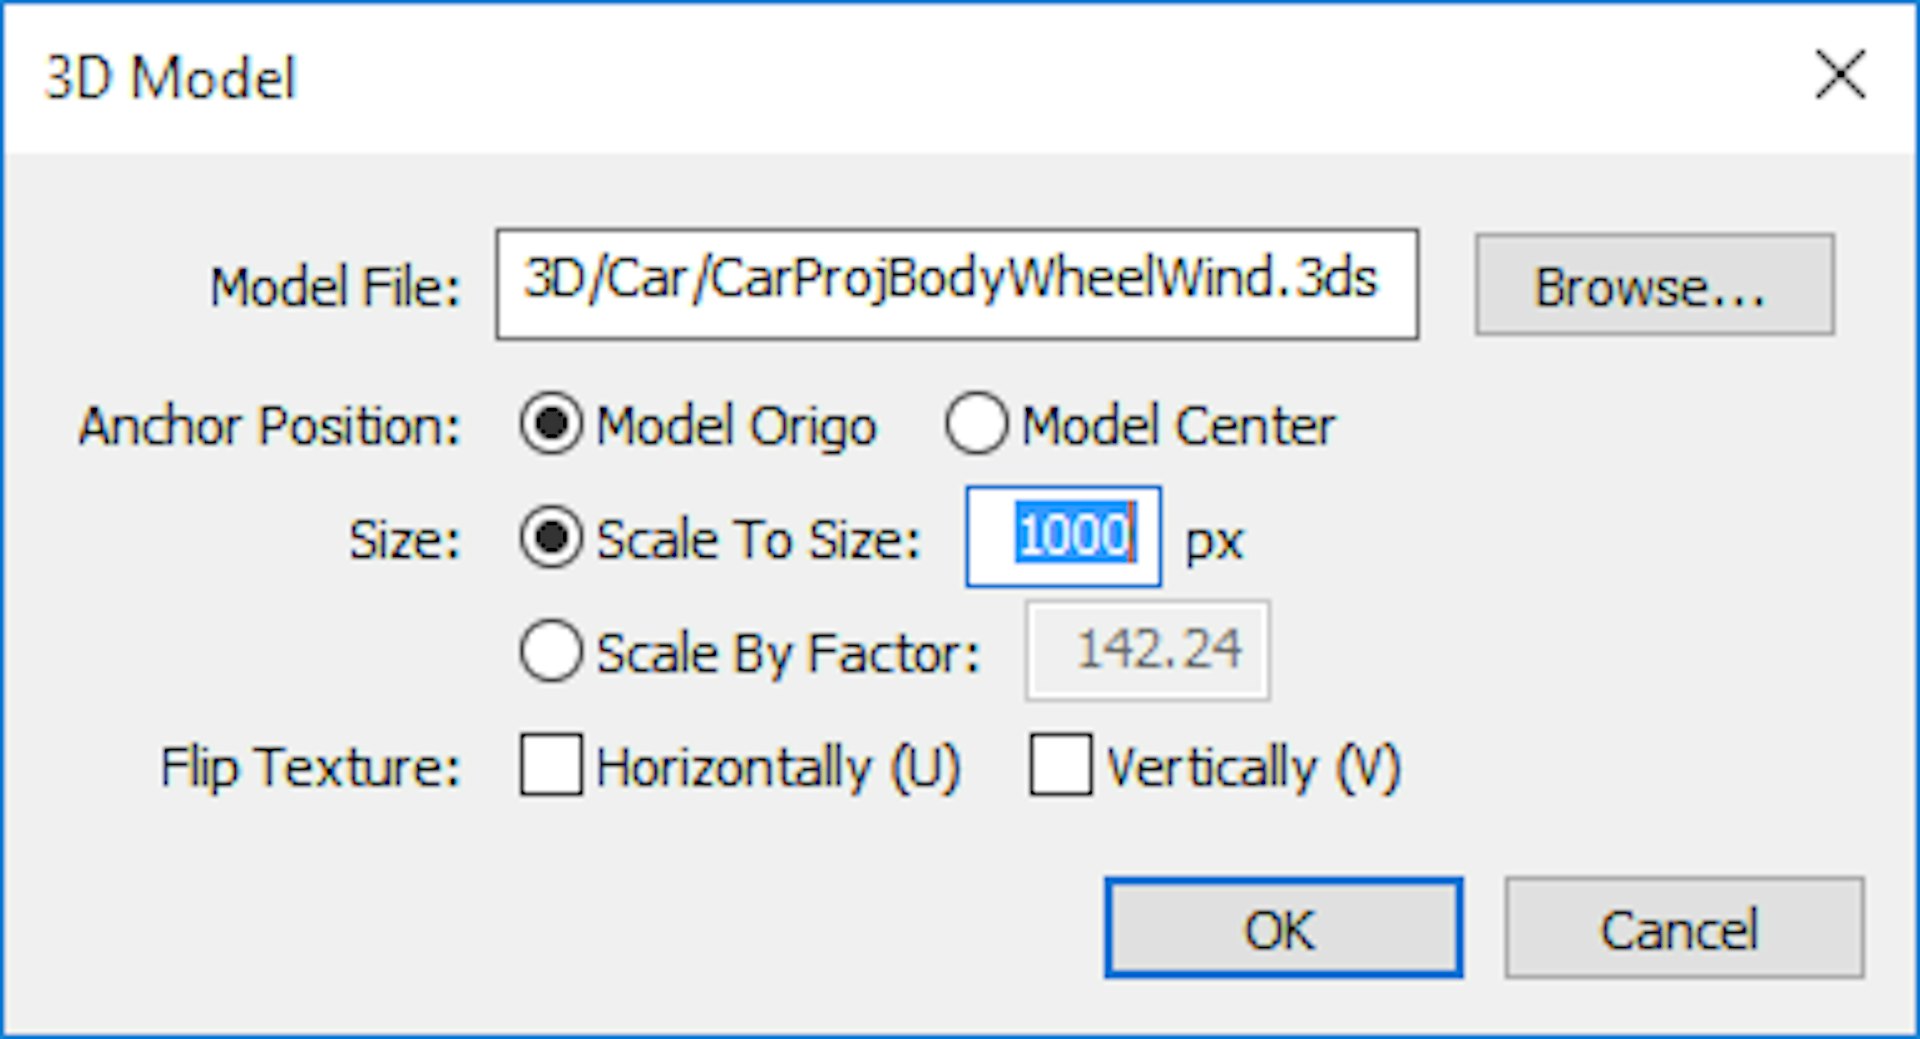
Anchor Position
Controls where WATCHOUT’s anchor point appears within the model. By default, it will be positioned at the X/Y/Z zero point (origo) of the imported model. However, in some cases, the model may not have been positioned properly before it was exported, and the anchor position may be way off. Then you can choose “Model Center” to position the anchor point in the center of the model instead. Alternatively, re-open the model in a 3D program and move it to its desired location.
Scale to Size
Scales the 3D model ensuring it will have the specified number of pixels along its longest axis. This is good default behavior since it avoids models being interpreted either as extremely small (often smaller than a single pixel) or extremely large. Simply type in the desired size, in pixels.
Scale by Factor
When bringing in multiple models, all originating from the same 3D application, you may instead want them to maintain their relative size from the 3D application. This is hard to do when scaling them all individually, each to its own pixel size. In this case, it is better to apply a fixed and known scale factor to all objects. You can do this by importing the main object first, and scaling it as desired using the “Scale to Size” option. Then read out the scale factor, and subsequently apply the same factor to all objects, selecting “Scale by Factor” instead.
HINT: By setting all 3D objects in a scene to “Scale by Factor” and “Model Origo”, you can combine multiple models while maintaining their position and size from the source 3D application. Simply place all objects at the same stage position, as specified inside the cue. Since they all will have the same origo and scale factor, everything will end up in its proper place.
Flip Texture
When you apply textures to a 3D object (see “Texturing” below), the placement of the image on the 3D object is controlled by texture coordinates embedded in the 3D model file. Different 3D applications use different standards for the direction of these texture coordinates. If the texture, when applied to the object, appears reversed or scrambled, try the “Flip Texture Horizontally” or “Vertically” checkboxes to see whether doing so corrects the problem. If not, you may need to go back into the 3D application and try out the image to be used as a texture there, to make sure it really matches the model and its texture coordinates.
Texturing
To give the model its texture and make it visible on displays, you must apply an image to it. This can be done in a variety of ways, with each method offering an increasing amount of flexibility.
- Using a still image. This applies the same texture throughout the entire cue. Useful for static 3D content.
- Using a video. The video starts playing at the beginning of the cue, but gives you no control over how it plays (for instance, looping or free-running).
- Using a Virtual Display. This provides the full compositing capabilities of WATCHOUT, allowing you to build the texture from multiple layers of still images, video, etc.
- To apply a texture to a 3D object, first select its cue on the timeline, then drag the image, video or virtual display onto the 3D object’s preview image in the Stage window.

IMPORTANT: The cue associated with the 3D object must be selected in order to drop a texture onto the object in the Stage window. This is also indicated by a purple selection box around the 3D object, as shown in the Stage window above. When dragging from the Media window, reveal the image to be used as a texture in the Media window first, before selecting the cue. Then drag the image from the Media window onto the 3D preview in the Stage window with a single drag-and-drop operation.
See this video for more details on how to bringing in 3D models and applying basic textures:

Using Multiple Textures
Some 3D objects have multiple texturable areas. If so, those are indicated by different colors in the Stage window.
To texture such an object, drop a separate texture onto each texturable area, replacing the solid color shown initially. See this video for more details on texturing multiple areas.
https://www.dataton.com/academy-video-watchout-6-3d-texturing
To see the list of textures applied to a model, open the cue’s dialog box and select the “Textures” tab. Here you can also select and delete individual textures. You don’t have to delete a texture in order to replace it. Just select the cue and drop a new texture onto the desired area to replace the previous one. However, explicitly deleting textures often makes it easier to see where any separately texturable areas are, due to the distinctive coloring of such areas.

Texturing with Virtual Displays
For maximum flexibility, use a Virtual Display to texture a 3D object. This indirect method gives you access to all the rendering, tweening and compositing capabilities of WATCHOUT in order to create textures. You can even incorporate dynamic content, such as live video or interactivity into the texture before applying it to the 3D object. See “Virtual Display” for more details on how to use this method. This video shows you this advanced technique in action:
https://www.dataton.com/academy-video-watchout-6-3d-texturing-using-virtual-displays