 Arabic
 Chinese
 French
 German
 Hebrew
 Italian
 Japanese
 Portuguese
 Spanish
Masking
WATCHOUT applies automatic edge-blending to overlapping 2D display areas. This is sufficient for most basic multi-display applications. However, this automatic method doesn’t work when mapping onto three-dimensional objects with multiple 3D Mapping Projectors. In this case, any masking required to blend the projectors’ edges must be applied manually.
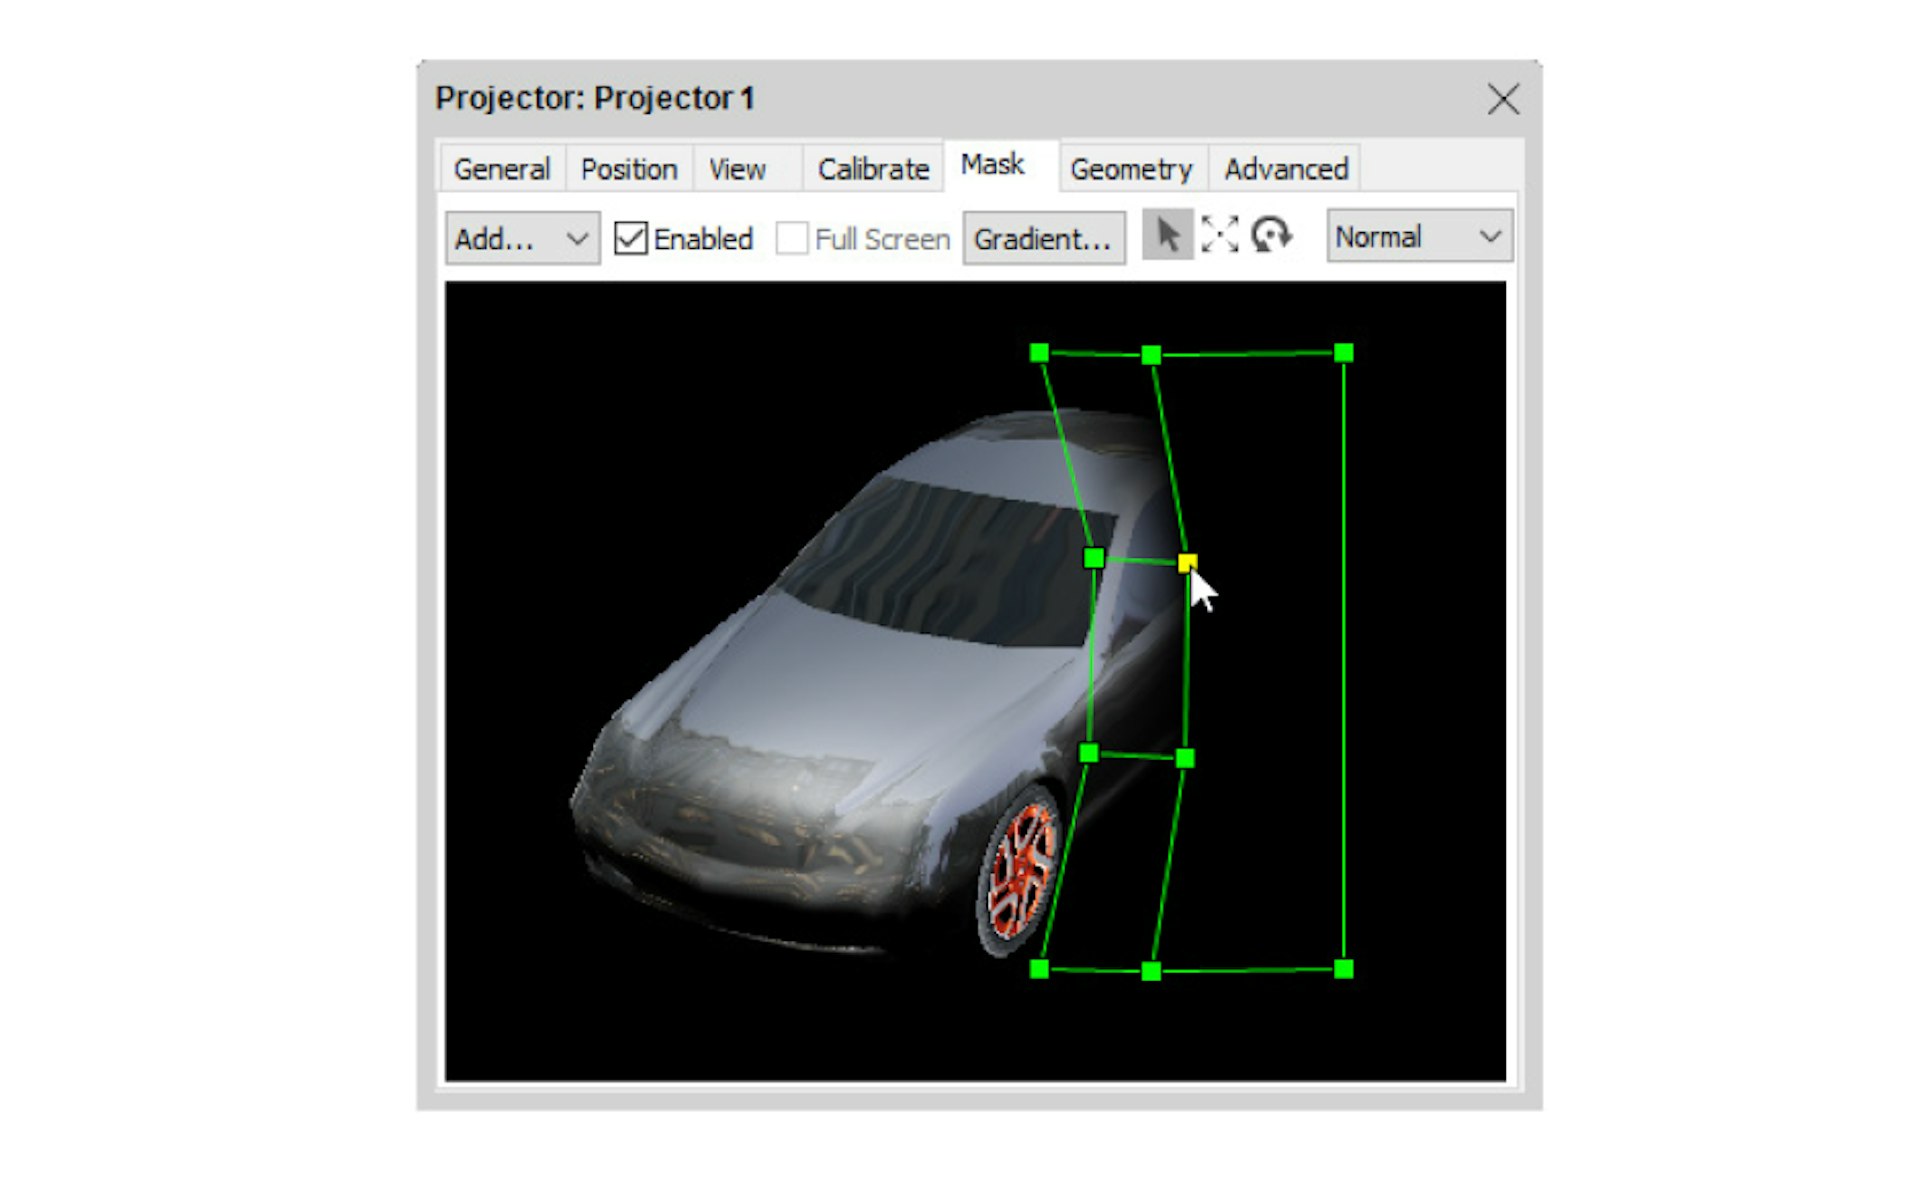
To add a soft mask to a projector, select its Mask tab and add the desired type of mask using the “Add…” menu:
Left, Right, Top, Bottom. Adds a mask along the specified edge. Use this to add custom edge-blend masks when the default one is insufficient, or as a starting point for another mask.
Rectangle. Adds a rectangular mask, with a feathered edge along all four sides.
Oval. Adds an oval mask, with feathered edge all around.
NOTE: The masks added using this menu are intended as starting points only. You can create any shape of mask from any starting point by manually moving, transforming or editing the mask. In the example above, a mask was created using “Add: Right”, and then moved and scaled as desired using the tools along the top.
Once a mask has been added, you can select, movie, scale and rotate it using the tools along the top:
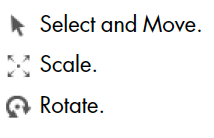
You can add any number of masks. Select which mask to manipulate using the arrow tool. The selected mask has a solid outline. When using the Scale or Rotate tools, an anchor point is shown. To scale or rotate around another point, move this anchor before scaling/rotating the mask.
HINT: You can use Copy and paste to copy the selected mask from one display to another, or between shows.
Uncheck “Enabled” to temporarily suppress a mask without removing it. This is useful when working with multiple masks across several projectors.
Editing the Shape of a Mask
To edit individual points in a mask, rather than the mask as a whole, double-click the mask with the arrow tool. Selection points appear for all vertices in the mask. Select individual points, or drag to select multiple points. Selected points can be moved, scaled or rotated using the tools along the top. To add new points, click a line between two points using the Select tool (which shows a pen cursor to indicate this). Delete a point by selecting it and choosing Clear on the Edit menu.
The outer points along a mask’s edge define the width of the feathered area. Move the outer points closer to the inner ones to reduce the width. Delete outer points to remove the feathered area. Alternatively, double-click a point to open its dialog box and select this behavior.
HINT: Make sure there’s an image on stage that appears on the display, allowing you to see the feathered edge.
HINT: Masks and their points can be nudged using the keyboard arrow keys.
To stop editing a mask, click outside the mask with the arrow tool.
Editing the Gradient of a Mask
By default, a linear gradient is applied to the edge of a mask. To change the curve of the gradient, select the mask and click the “Gradient…” button. This displays a dialog box similar to the one used to edit the standard edge blend gradient in the Preferences dialog box (see “Edge Blend”). Use the same technique as described there to edit the gradient curve.
Image Masks
Still images can also be used as display masks. To create an image mask, drag an image media item from the media list to the mask tab of a display dialog. This creates a grayscale mask version of the image, where darker colors are opaque, and brighter colors are more transparent. This is useful, for example, if you want to be able to draw your masks in another software application, for example Photoshop.
Once an image mask has been created, it can be scaled and rotated in the same manner as other masks. You can also set it to full screen mode (unlike other display masks) by checking the “Full screen” check box, which becomes available when an image mask is selected. In this mode, the image will be automatically stretched and placed to cover the whole display surface
Other Uses for Masks
While this masking feature is primarily designed to handle projector blends for 3D mapping purposes, it can also be used as a general masking tool for both 3D and 2D projectors. For instance, if you’re projecting onto the outside wall of a building, you may want to mask out windows and other areas where projection is not desired. This can be accomplished by adding the required number of masks to the projector.
You can also use manual masking in place of the automatically generated edge blends, for example to blend between different types of projectors or where the automatic edge blending doesn’t offer sufficient control. If you design your own custom masks, turn off the automatically generated blending masks by unchecking “Use Default Soft Edges” on the Advanced tab (see below – applies to 2D Projectors only).