 Arabic
 Chinese
 French
 German
 Hebrew
 Italian
 Japanese
 Portuguese
 Spanish
Media Menu
Add Media File
Opens a dialog box where you can choose files to be added to the Media window. Alternatively, simply drag the file into the Media, Stage or Timeline window.
Add Text
Adds a generated image for displaying text. Use this as an alternative to creating text using Photoshop or other applications. Text images created using this method can be edited directly inside WATCHOUT, thereby speeding up the production workflow. See “Text” for more details.
Add Proxy
Adds a proxy media item of the kind specified. Use a proxy to handle media that can not be added simply by dragging into the Media window, as in the following cases:
- The media file isn’t recognized by the production computer in the manner you want, for instance, a sequence of still images that you would like to treat as if it were a video file.
- The media file is a large movie or still image that has been pre-split into multiple files (see “Pre-splitting a Large Video”).
- You want to incorporate stereoscopic video into your presentation, using separate left-eye/right-eye video files.
- The media may not yet be available, or may – for other reasons – need to be provided or replaced manually on the display computer at a later time.
Use a media proxy to accommodate any of these cases. Once a media proxy has been added to the media list, it can be used on the timeline just like other media items.

Image Sequence
This option applies to video proxy only. Select this option to treat a folder of numbered still images as a video.
IMPORTANT: In order to play image sequences, a very fast, solid state (e.g. SSD), storage subsystem is required.
After selecting this option, click the Browse button and choose the folder containing the image sequence. The names of the files inside the folder have the following restrictions.
- The files must be of type TIFF, PNG, JPEG, TGA or DDS, with uncompressed TGA being the recommended format for best performance. For DDS images, the only texture format supported are DXT1, DXT5 and RGBA.
- All files must have the same extension.
- Files must be numbered consecutively.
- The number of digits in the name must be the same for all files.
- The sequence can start at any number, but would typically start at 1.
- The files names must all begin with the same initial string of characters.
- The sequence number must come immediately before the period, followed by the file extension.
Here are some valid examples:
- Img0001.tiff, Img0002.tiff, Img0003.tiff
- Spring2015_00001.tif, Spring2015_00002.tif, Spring2015_00003.tif
You can also use image sequences for stereoscopic video and video pre-split for designated displays. In those cases, there are strict naming requirements. For stereoscopic image sequences, create a folder with the desired media name (“The Finals” in the example below). Inside this folder, create two subfolders named Left and Right. Those subfolders must contain the image sequence files for the corresponding eye.

NOTE: The identical file-naming convention outlined above applies to all files in both folders. Thus, if the files in the ”Left” folder are named Left0001.tiff, Left0002.tiff and the files in the right folder are named Right0001.tiff, Right0002.tiff, the image sequence will not play since the initial string of characters are different.
For image sequences that are pre-split for designated displays, create a folder with the desired media name (“The Finals” in the example below). Inside this folder, create a folder for each display on which the video will appear, using the display’s name as the folder name. As with stereoscopic image sequences, all files in all folders must use the same naming convention.

If you want to combine both stereoscopic and pre-split image sequences, create a folder with the desired media name. Inside this folder create two folders for each display, named Display1-Left and Display1-Right (replacing ”Display1” with the actual name of your displays). All files in all folders must use the same naming convention.

Pre-split
This option applies to video and image proxies. Check this if you have pre-split a still image or large movie (see “Pre-splitting a Large Video”). In this case, the resulting files must be placed in a folder specified in the File/Folder field. This folder must contain one file per display intersecting the movie, each file named after its target display.
For example, assume you have a large video called “LargeMovie.mpg” that intersects two displays named “Display 1” and “Display 2”. You would then pre-split the video into two files. Name those files “Display 1.mpg” and “Display 2.mpg” and put them in a folder named “LargeMovie”. Finally, specify that folder in the File/Folder field of the video proxy. The same process would apply if you had a large image.
IMPORTANT: Always append the proper file extension to the name of either the video files or the folder containing the pre-split files. This ensures that the correct video playback mechanism is used. By default, Windows may not display filename extensions. To show file extensions, choose “Folder Options” on the Tools menu in Windows Explorer, click the View tab, and uncheck “Hide extensions for known file types”.
Stereoscopic
Select this option to play stereoscopic video. In this case, you must supply separate files corresponding to the left and right eye’s viewpoint. Those files must be placed in a folder selected using the Browse button. Name the files Left and Right respectively, appending the proper file type extension.
NOTE: WATCHOUT does not support active stereo (frame-sequential) but only left and right stereoscopic video.
You can combine Pre-split and Stereoscopic videos by naming each video according to the display as well as its eye affinity, separated by a dash. For instance, to present a stereoscopic pre-split across two edge-blended projection screen areas, name the files as follows:
Display 1-Left.mpg Display2-Left.mpg
Display 1-Right.mpg Display 2-Right.mpg
File/Folder
The title of this field reads “Folder” if “Image Sequence”, “Pre-split” or “Stereoscopic” is selected, otherwise it reads “File”. In this field you specify the file or folder associated with the media item. Use the “Choose” button next to the field to choose an existing file/folder. If you set “File Transfer” to “Manual”, you should type the fictive, relative path to a file that may not exist on the production computer, but will be provided manually to the display computer.
File Transfer
Specifies whether the file will be transferred manually or automatically from the production computer to the display computers. Normally, you would choose “Automatic”. You may choose “Manual” if the file is to be provided later, directly to the display computer, or if the file is not yet available.
NOTE: If you choose “Automatic”, WATCHOUT will make sure that the file/folder you specified actually exists prior to closing the dialog box. If you choose “Manual”, it becomes your responsibility to provide the file, and WATCHOUT will not verify its existence.
Auto-Refresh on Update
If selected, an updated media file associated with this proxy will be transferred to the display computers whenever you use the Stage Update command, without first having to use the Media Refresh command.
IMPORTANT: When using this feature, media files must maintain their original size. If required, you can plan ahead by making the original larger than necessary to accommodate future changes.
Duration
Enter the duration of the media here. Applies to moving images (video, image sequences) and sound only.
Frame Rate
Enter the desired playback rate here. Applies only when “Image Sequence” is selected. Otherwise the frame-rate is specified by the video file itself.
HINT: You can modify the default playback rate of video in the cue playing the video (see “Playback Speed”).
Preview
Allows you to choose a scaled down version of a video for preview purposes. This is useful in cases where the full video is too heavy to play in the production computer. This may be due to the production computer being less powerful than the display computers, or when playing multiple video files simultaneously across many display computers.
Thumbnail
Allows you to choose a thumbnail image to represent the proxy in the Media window, inside cues and in the Stage window preview. If not specified, a default icon will be displayed.
Dimension
Specifies the size of the image. Applies to still and moving images.
Transparency
Allows you to specify whether the image contains transparent areas, as well as the form of transparency used. Normally, WATCHOUT determines this from the information in the media file, but when using a proxy, you must specify this manually. Setting this incorrectly may cause the image to display without transparency or not at all. Applies to still and moving images.
The types of transparency supported by WATCHOUT include:
- None. The image or video has no alpha channel.
- Straight Alpha. The transparency information affects the alpha channel of the image only.
- Pre-multiplied with White. The transparency affects both the alpha channel and the pixels in the image so that the pixels in fully transparent areas are white. This is often used in material produced for printing purposes.
- Pre-multiplied with Black. The transparency affects both the alpha channel and the pixels in the image so that the pixels in fully transparent areas are black. This is often used in material produced for video compositing purposes.
Enable WATCHPAX Hardware Acceleration
Applies only when playing certain video formats, such as H.264, on WATCHPAX. May improve video playback performance when playing high resolution video. This checkbox has no effect when using other display computers.
Apply Frame Blending
This setting often results in smoother video playback, at the possible expense of some loss in image sharpness. This is especially true when the frame-rate of the video is not an even multiple of the display computer’s frame-rate (for instance, when playing 25 fps video on a display computer set to 60 fps). This is accomplished by blending adjacent frames together, weighted by their temporal position in the sequence.
Add Composition
Add a Composition to the Media window. A composition allows you to group images together (including their tween tracks) in a way that can subsequently be used as a media item on other timelines. Here are a few videos that show how to use compositions:
Compositions: https://vimeo.com/134594131
Composition example: https://vimeo.com/134594382
Scale, move and rotate compositions: https://vimeo.com/134594385
Nesting compositions: https://vimeo.com/134594388
See “Restrict Rendering to Stage Tiers” for a description of the fields in the dialog box shown by this command.
Add Computer Screen
This feature allows you to incorporate a live image of a computer screen into WATCHOUT. This can be used to show Excel graphics, Powerpoint slides, a web browser, or similar software applications, as part of your presentation.
The image displayed on the screen of the source computer is sent continuously via the network to the WATCHOUT display computers, where WATCHOUT composites it with other media. For example, you can put a plain Powerpoint presentation on top of a large, high-resolution background, thereby enhancing it with all the high-quality presentation capabilities of WATCHOUT.
To incorporate a computer screen into your presentation, follow these steps:
- Install, activate and configure VNC server software on the remote computer (see “VNC Server Software”).
- Add a Computer Screen media item to the Media list using this command on the Media menu. Configure it as described below.
- Drag the computer screen object from the Media list onto the Stage, and program it using cues as any other image element.
- The same capabilities apply to computer screen images as any other images. For instance, you can program its position, scale and opacity. Since the images are sent across the network to all display computers, you can show the computer display across multiple display computers.
Computer Screen Settings
In the Computer Screen dialog box, type the IP number of the remote computer into the Address field, and the VNC password into the Password field. Set Dimensions to the size of the display of the VNC server (reducing the resolution may improve performance).
The Screen field is rarely used, and should generally be set to zero. It may be used with some implementations of VNC server software which support multiple screens or work-spaces.
Set “Stage Preview” to “Live” if you want to preview the Computer Screen in the Stage window of the production software. Otherwise, set this to “Thumbnail”. This setting affects the Stage window preview only – not what’s shown by the display computers.
NOTE: The computer that’s being viewed does not require a WATCHOUT license key.

Add Live Video
This feature allows you to display live video, such as a camera feed, as part of your WATCHOUT presentation. The live video feed must be connected to each display computer that is expected to show it. For instance, if you want to show live video across two displays, the video signal must be fed to both display computers (typically using a video distribution amplifier). See “Live Video Input” for more details.
To activate the Live Video feature, follow these steps:
- Start WATCHOUT display software on the display computer.
- Press Ctrl-W to switch to window mode.
- On the “Video In” menu, make sure that your video input device is associated with the relevant device number.
- Connect a video source to the video input.

To use Live Video in your presentation, do as follows:
- Add a Live Video media item to the Media list using the command on the Media menu, configuring it as described below.
- Drag the Live Video object from the Media list onto the Stage or a timeline, just like any other media object.
Live Video supports the same capabilities as video played from disk, allowing you to program its position, scale, rotation and opacity.
To show live video across multiple displays, you must connect the video signal to each of those display computers. Furthermore, this video signal must be associated with the same input number on each display computer that is to display it.
Live Video Settings
In the Basic settings tab of the Live Video dialog box, set “Input Device” to the device number selected on the “Video In” menu and select a video standard appropriate for your video signal.
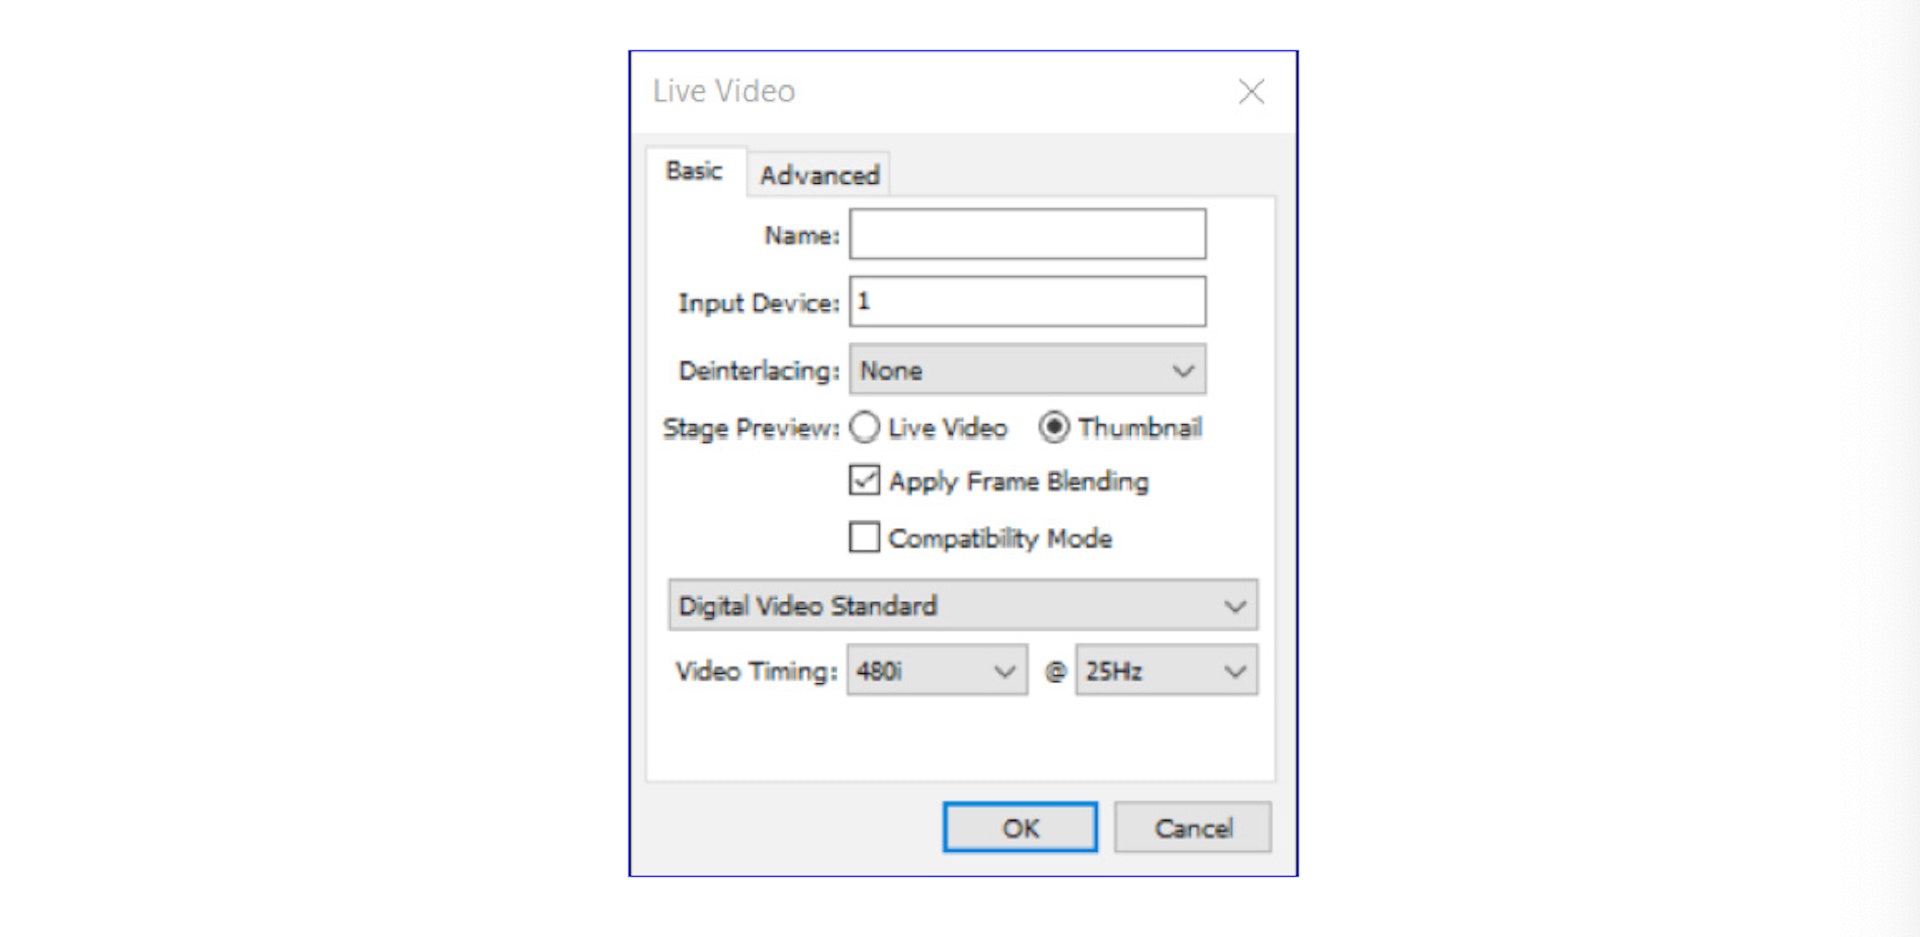
Deinterlacing. Video originating from some video cameras uses an interlaced signal, just like a PAL or NTSC TV set. Presenting such a video signal on a non-interlaced display device, such as a video projector or other display device designed to be used with computers, results in visual artifacts often referred to as “combing” around the edges of moving objects. Use the Deinterlacing pop-up menu, set to “Good Quality” or “Best Quality” to rectify this problem when required.
IMPORTANT: Do not use this feature unless necessary. Some video material and some cameras that can be set to a “progressive scan” mode do not need deinterlacing, and using it may reduce the image quality.
Stage Preview. Set to “Live” if you want to preview the Live Video in the Stage window of the production computer. Otherwise, set this to “Thumbnail”. This setting affects the Stage window preview only – not what’s shown by the display computers.
NOTE: In order to preview Live Video in the Stage window of the production computer, this computer must have the appropriate video capture capabilities, and the video signal to preview. Set the input associations for the production computer in Preferences (see “Video In”).
Apply Frame Blending. This setting may result in smoother video playback, at the possible expense of some loss in image sharpness. This is especially true when the frame-rate of the captured video is not an even multiple of the display computer’s frame-rate (for instance, when capturing 25 fps video on a display computer set to 60 fps). This is accomplished by blending adjacent frames together, weighted by their temporal position in the sequence.
NOTE: Frame blending, when applied to live video capture, increases the latency of the displayed video by about half a frame.
Compatibility Mode. Some video input interfaces have had problems with dropped frames. Selecting the compatibility mode may improve the performance on these input interfaces.
In the Advanced tab, select a “Signal Input” that is appropriate for your input signal source. If your input interface has multiple inputs for the same kind of signal, enter the desired input number in the field to the right of the “Signal Input” pop-up menu under the Advanced settings tab.

Trim Edges. The fringes of a video signal sometimes contain noise. These four fields allow you to selectively trim each of the edges of the video image to remove such noise.
Dimensions. With most video standards, the dimensions are fixed. However, when selecting “Other” on the “Video Standard” pop-up menu, you can manually enter the desired dimensions. Use this, for example, to enter the size of a computer signal brought into WATCHOUT using a DVI or DisplayPort capture card.
NOTE: The dimensions shown are after any edge trimming. For example, if the original image is 640 by 480 and you trim 10 pixels at each edge, the resulting dimensions become 620 by 460.
Using Multiple Video Inputs
WATCHOUT supports up to twenty video input devices. The number of video inputs that can be displayed simultaneously depends on your computer hardware, type of video input device, etc.
Most video input devices have multiple connectors – sometimes for different kinds of video signals (for example, DVI and SDI). You specify which one to use in the Live Video media dialog box. Add more Live Video media objects to access different inputs on the same device.
NOTE: With some capture solutions, you can only display one input at a time. In this case, it’s generally not possible to make a clean switch back-to-back from one input to another on the same input device. You need to leave a couple of seconds between the end of the cue displaying one input and the beginning of the cue displaying the other.
Add Dynamic Image
Adds a media item for viewing images originating from a “WATCHOUT Dynamic Image Server” (see “Dynamic Images”).

Name. The name used to refer to the media item.
Server Address. The IP number of the computer running the dynamic image server application. If left blank, WATCHOUT will use the address specified in the Preferences dialog box.
Type. Specify whether the source is a still image, a Flash animation or an HTML web page.
Stage Preview. Controls whether the production software’s Stage window will display the live dynamic image or a static place-holder.
Width/Height. The dimensions of the dynamic image. Generally, this should match the actual source image file. When rendering HTML, specify the size to be rendered beginning from the top of the web page.
Path. The path to the content to be rendered. This can take either of two forms:
A local path on the dynamic image server itself, as a relative path (that is, one that doesn’t begin with a protocol specifier or a slash).
A fully qualified URL for an external web resource, accessible to the dynamic image server.
For example, if a file named “CNN_News.swf” is in a folder named DynImg, located in the WATCHOUT installation folder, set the path to:
DynImg/CNN_News.swf
HINT: Use the -f command line parameter of the dynamic image server to specify an alternate location of any locally served content (see “Alternate File Location”).
To access a web page over the Internet, set the path like this:
http://www.bbc.com/weather/3448439
HINT: To display only a portion of a web page, such as a weather map on a weather site, use a Crop tween track to crop out the relevant part of the image.
Parameters. Additional parameters passed to the dynamic image being served (see “Dynamic Image Parameters”).
New Folder
Adds a new folder to the Media window, allowing you to group related media items. Such a group of media in the Media window is independent of the folders on your hard disk, and serves merely as a means to organize items in the Media window.
Large Thumbnails
Displays larger thumbnail images in the Media window. This gives a better preview of each image, but reduces the number of items visible in the list.
NOTE: The size of wide thumbnails in the Media window is also affected by the width of the Thumbnail column. Make this column wider to see wide thumbnails.
Refresh
Refreshes items in the Media list by reloading their information from the associated media files. A dialog is displayed allowing you to refresh media that has been changed, or all media, regardless of the file’s last modified time-stamp.
Refresh Automatically
Activates a mechanism that recognizes when media files have been changed and automatically refreshes them. Example: You added an image file to your WATCHOUT show, but subsequently edited it in image editing software. When the image file is saved to disk, WATCHOUT detects that it has been changed/saved and will immediately add the updated image into your show.
This works well with simple media files such as images and 3D models. However, it does not work with streaming media such as video and audio.
Select Unused
Selects all unused items in the Media window. After reviewing the selection, you can choose Clear on the Edit menu to remove the unused media items.
IMPORTANT: Only media items directly or indirectly associated with cues on the Main Timeline, or any auxiliary timeline, are considered as being used. Specifically, media items used in compositions are only considered used when the composition itself is being used. Hence, you can prevent a composition and its media from being considered unused by adding it to an auxiliary timeline.