 Arabic
 Chinese
 French
 German
 Hebrew
 Italian
 Japanese
 Portuguese
 Spanish
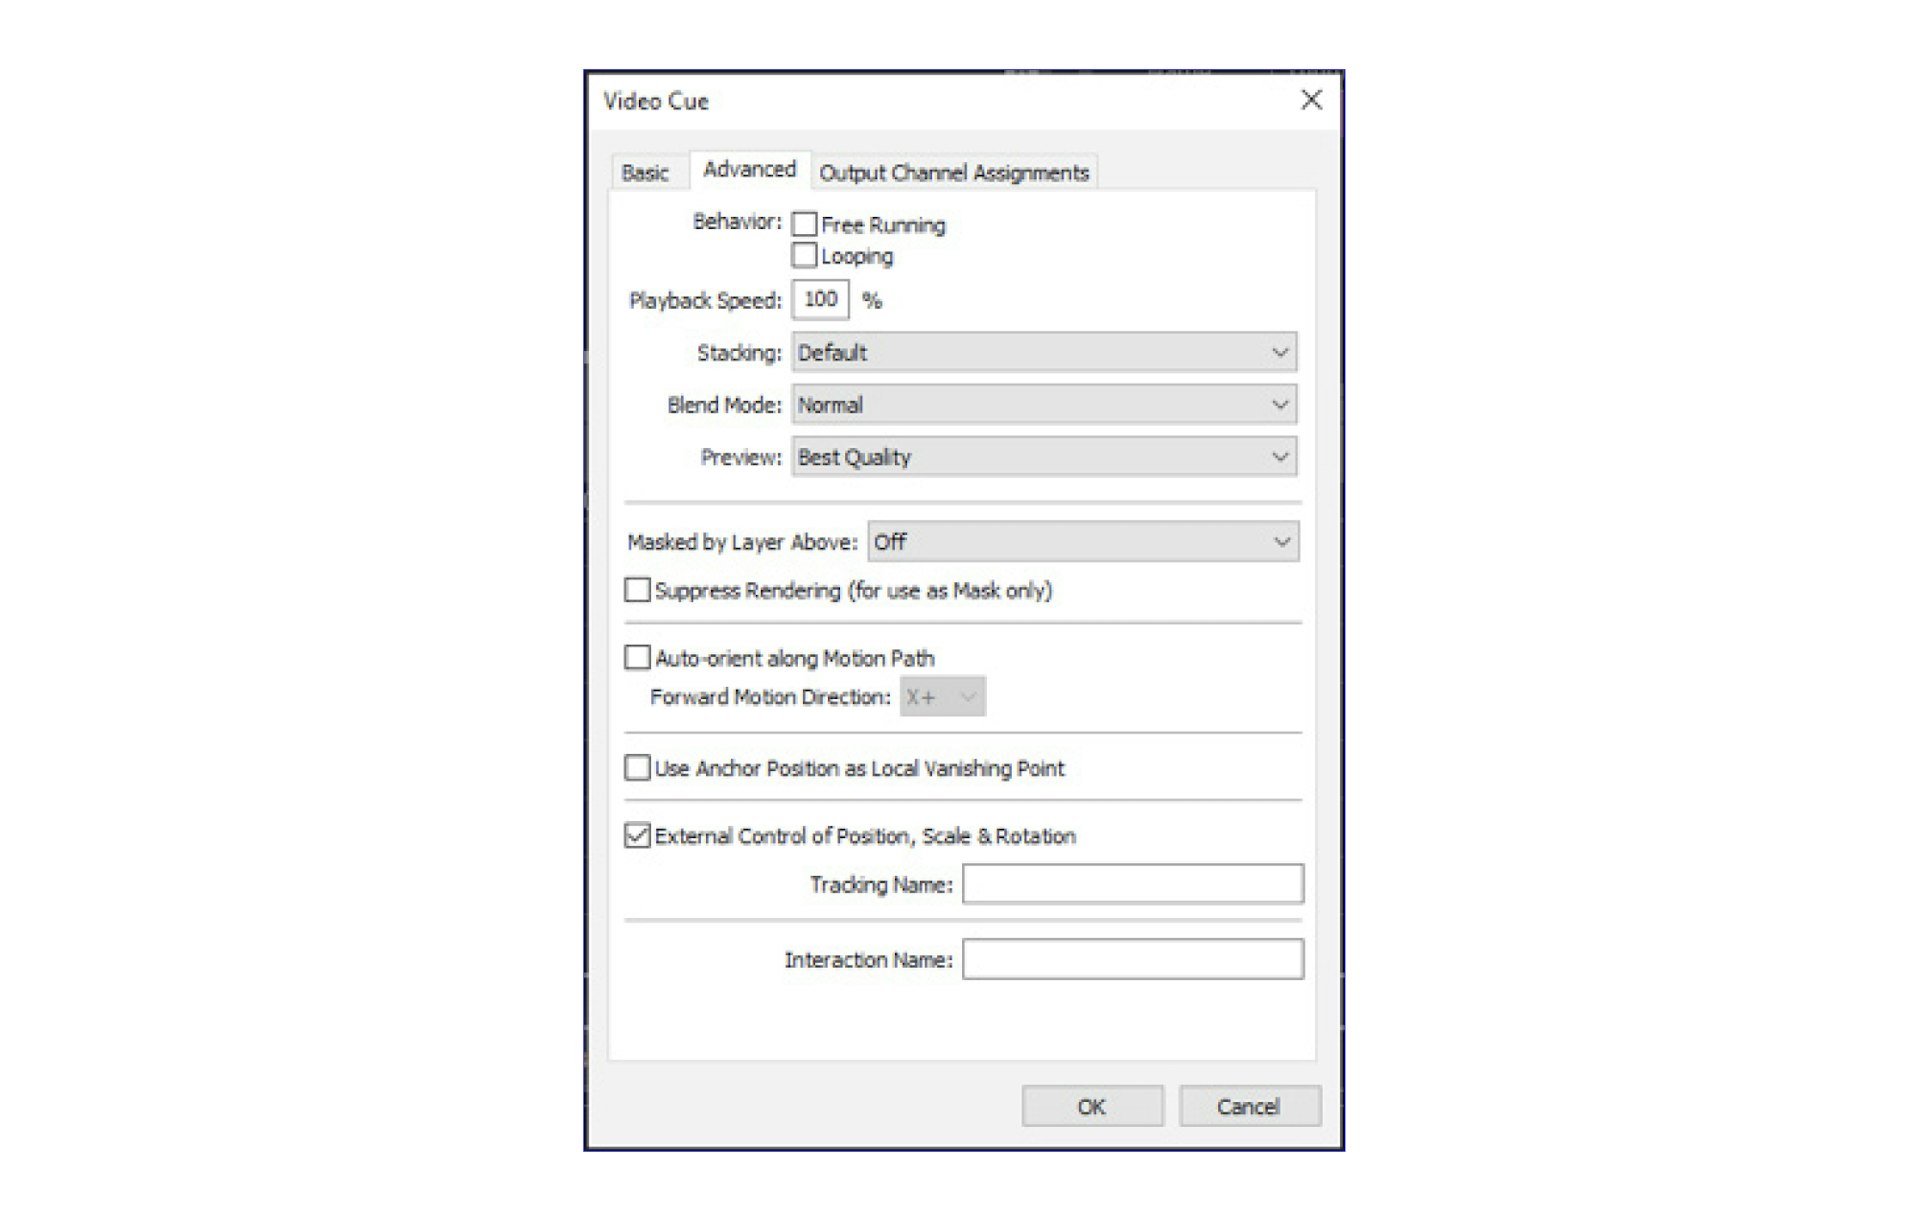
Advanced Cue Specifications
To adjust additional settings of the cue, open its dialog box then select the “Advanced” tab. Some options apply only to specific media types.
Free Running
Causes sound, movie or composition media to continue playing even if the timeline is paused. This is particularly useful in speaker support or conference situations, where you may be cueing the timeline manually. While waiting at a pause cue, you may still want to have something moving on stage.
HINT: Free Running and Looping behavior can be combined to create continuous playback of undetermined duration.
Looping
Causes sound or movie media to loop (re-start repeatedly) when played past its duration. This is particularly useful for short, cyclical animations, where the movie then contains only a single cycle.
NOTE: To see the effect of this behavior, the duration of the cue must be extended past the media’s natural duration, or made free-running.
Playback Speed
When set to 100%, video plays at its normal frame-rate. Set to a smaller value to slow down the video. Enable “Frame Blending” inside the video media object to make video that has been slowed down play smoother (see “Apply Frame Blending”).
NOTE: Audio embedded in the video will not play properly unless set to 100%.
Stacking
When using WATCHOUT in its traditional 2D mode, images originating from higher timeline layers cover images from lower layers. This is the behavior obtained when choosing “By Layer”. However, when positioning and moving images along the Z axis (towards or away from the viewer), you may want images closer to the viewer to always appear in front of more distant objects. In many cases, this can be accomplished by placing the cues onto layers in a matching order, which is the preferable solution. When this is not possible, choose “By Z-Depth” instead, to make images with lower Z position appear in front of images with higher Z position.
NOTE: Images with transparent or semi-transparent areas may not blend with other objects as expected when using “By Z-Depth”. If so, re-arrange the cues onto layers in the desired front-to-back order.
The “Default” option is identical to “By Layers” for cues on the Main Timeline or Auxiliary timelines. For cues in compositions, this setting makes images inherit the corresponding setting of the cue that plays the composition.
Preview
Controls the maximum Stage window preview quality. Set to “Reduced” to preview the image using its thumbnail. Set to “None” to suppress preview altogether. When set to anything besides “Best Quality”, the name of the cue is shown in italics to indicate this. Reduce this setting if previewing this cue adversely affects the performance of your production computer.
NOTE: The preview quality is ultimately constrained by the setting on the Preview menu (see “Preview Quality”). The cue setting specifies the maximum quality by which the cue will be previewed.
Blend Mode
These options control how the image interacts with other images that it overlaps on stage. They perform similar to those with the same name in applications such as Adobe Photoshop.
- Normal makes the top image completely cover the bottom image (unless it has transparent areas or opacity applied).
- Add results in a very bright image, suitable for adding highlights to other images. Black areas in the overlapping image have no effect.
- Multiply results in a darkened image. White areas in the overlapping image have no effect.
- Screen is similar to Add, but softer and often produces a more pleasant effect
- Lighten keeps the lightest parts of the images.
- Darken keeps the darkest parts of the images
- Linear Burn is similar to the Multiple mode, but produces a more intense result.
Masked by Layer Above
Allows you to use one image or video as a mask for another one. The image to be used as a mask must be placed on the layer immediately above the one to be masked. If the mask image has an alpha channel, choose the “Alpha Mask” mode. Otherwise chose “Luma Mask” to use the brightness of the image to create the mask. Choose the “Inverted” version of each mask mode to reverse the mask. Masking is indicated by red dots running along the top of the masked cue.

See these videos for more examples on how to use masks:
Masking: https://vimeo.com/134593900
Masking & custom wipes: https://vimeo.com/134594128
Masking with a video clip: https://vimeo.com/134594127
Combining masking with other effects: https://vimeo.com/134593901
Suppress Rendering
When using an image as a mask, you often don’t want the image itself to be rendered – only its masking effect. To accomplish that, select this checkbox in the cue that controls the image used as a mask.
NOTE: Select “Masked by Layer Above” in the cue of the image being masked, and select “Suppress Rendering” in the cue of the image being used as a mask.
When this option is selected, the cue’s name is shown in italics.
Auto-orient along Motion Path
Causes an image or 3D model to rotate according to its motion direction at any given time. This is useful when animating an object that should always point along the path of motion, such as an airplane.
The “Forward Motion Direction” options control the orientation of the image as it moves along the motion path. Choose the direction you want to be considered forward, with the default value being the right edge of the image (X+).

NOTE: In some cases you may also need to apply Rotation to the image to make it point in the desired direction.
See these videos for more on animations:
Using animations, part 1: https://vimeo.com/134593525
Using animations, part 2: https://vimeo.com/134593526
Use Anchor Position as Vanishing point
When positioning 3D models or rotating images in 3D space, a perspective must be applied to achieve the proper result on a flat screen. This perspective must assume a particular vantage point. The far side of this point is called the vanishing point. The default vanishing point used in your WATCHOUT scene is set in the Preferences dialog box (see “3D Perspective and Stereoscopy”).
However, in some cases you may want to handle multiple, more or less independent, displays as a single WATCHOUT show. Those displays may not make up a single image canvas, but several image areas, where each should appear on its own. In this case, applying a single vanishing point to all these displays doesn’t make sense, and will make X/Y axis rotations and 3D objects on those displays appear incorrect and distorted.
To manage such cases, you can do either of the following:
- Select “Use Anchor Position as Vanishing point” in each cue related to that display. This method is suitable if there’s a small number of cues.
- Put all cues for that display in a Composition, and select “Use Anchor Position as Vanishing point” in the cue that displays this composition.
- Use a 3D Mapping Projector instead of a 2D Display to produce the image for the display. In this case, no special setting is required, since each 3D Projector manages its own perspective, independent of the global vanishing point setting.
In the first two cases, you must also locate the anchor point in the cue as desired, since it will control the vanishing point.
NOTE: This checkbox applies only for 2D and Virtual displays. It doesn’t apply for 3D Projectors, which manage their own perspective based on their position and target point.
External Control of Position, Rotation and Scale
Usually, you control media cue position, rotation and scaling using the corresponding tween tracks alone. However, you may occasionally want to control these parameters from an external source, such as a MIDI, tracking, DMX input, or via the network (see “setInput”). Select this checkbox to allow for such external control. Add the desired tween track and use its formula button to assign the control source to the desired parameters (see “External Control of Tween Tracks”). Alternatively, a “Tracking Name” may be specified to allow a Tracking Input to control the position and rotation of a media cue, see “Tracking Input” in the chapter titled “10. Inputs and Outputs”.
NOTE: The positional data received via a Tracking Input will be relative to a media cue’s anchor position.
NOTE: For still images, this option is only available when the image is set to be optimized for “More Effects and Capabilities” (see “Optimize For”).
IMPORTANT: Selecting this option increases the load on all your display computers. Do not choose this option unless necessary.
Interaction Name
This value is only used by the hitTest command (see “hitTest”).
Texture
These settings apply only to 3D model cues.
Render
Surfaces on a 3D model have two sides: an outside and an inside. For a closed 3D model, such as a sphere, you normally see just the outside. For other more complex models, you may see both the outside and inside. What’s considered “outside” is controlled by the 3D model itself, and can be edited in a 3D application by altering the “normals” of the model.
When applying a texture to a 3D model in WATCHOUT, it may appear on the outside, the inside or both sides (default). If you prefer not to see the texture on the inside of the model, select “Outside”, or vice versa.
Extension
Usually, a 3D model is designed to have a texture spanning its surface exactly. This is defined inside the 3D model by keeping its texture space (UV coordinates) within a 0-to-1 range. Some 3D models, however, may have one or many areas where the texture space extends outside this range. If so, the settings on the “Extension” menu determine what’s to happen outside this range.
Repeat Image Side by Side
The texture you apply will be shown repeatedly, side by side, for as large a range as required. For instance, if the texture range in the 3D model is five wide by five tall, 25 copies of the texture will be shown in a 5-by-5 arrangement.
Repeat by Mirroring Even Copies
This option is similar to the previous one, but will cause copies at even positions in the grid to be mirrored or flipped. This works better with some textures to create a more seamless look.
Extend image edge pixels
In this mode, texture coordinates that fall outside the 0…1 range will be filled with whatever color is at the closest edge in the texture you provide.
Texture Tab
This tab lists the names of all textures currently applied to the model. Select a texture in the list and press the “Delete Texture” button to remove it from the model. Doing so replaces the texture with a solid color, allowing you to see the extent of a separately texturable area inside a model. Select multiple textures in the list by Shift- or Control-clicking.
NOTE: You don’t need to delete a texture in order to replace it. Simply drop a new image in its place while the cue is selected.