 Arabic
 Chinese
 French
 German
 Hebrew
 Italian
 Japanese
 Portuguese
 Spanish
Tween Tracks
Tween tracks control the appearance of media on stage over time. Depending on the type of media associated with the cue, you can add one or more tween tracks.

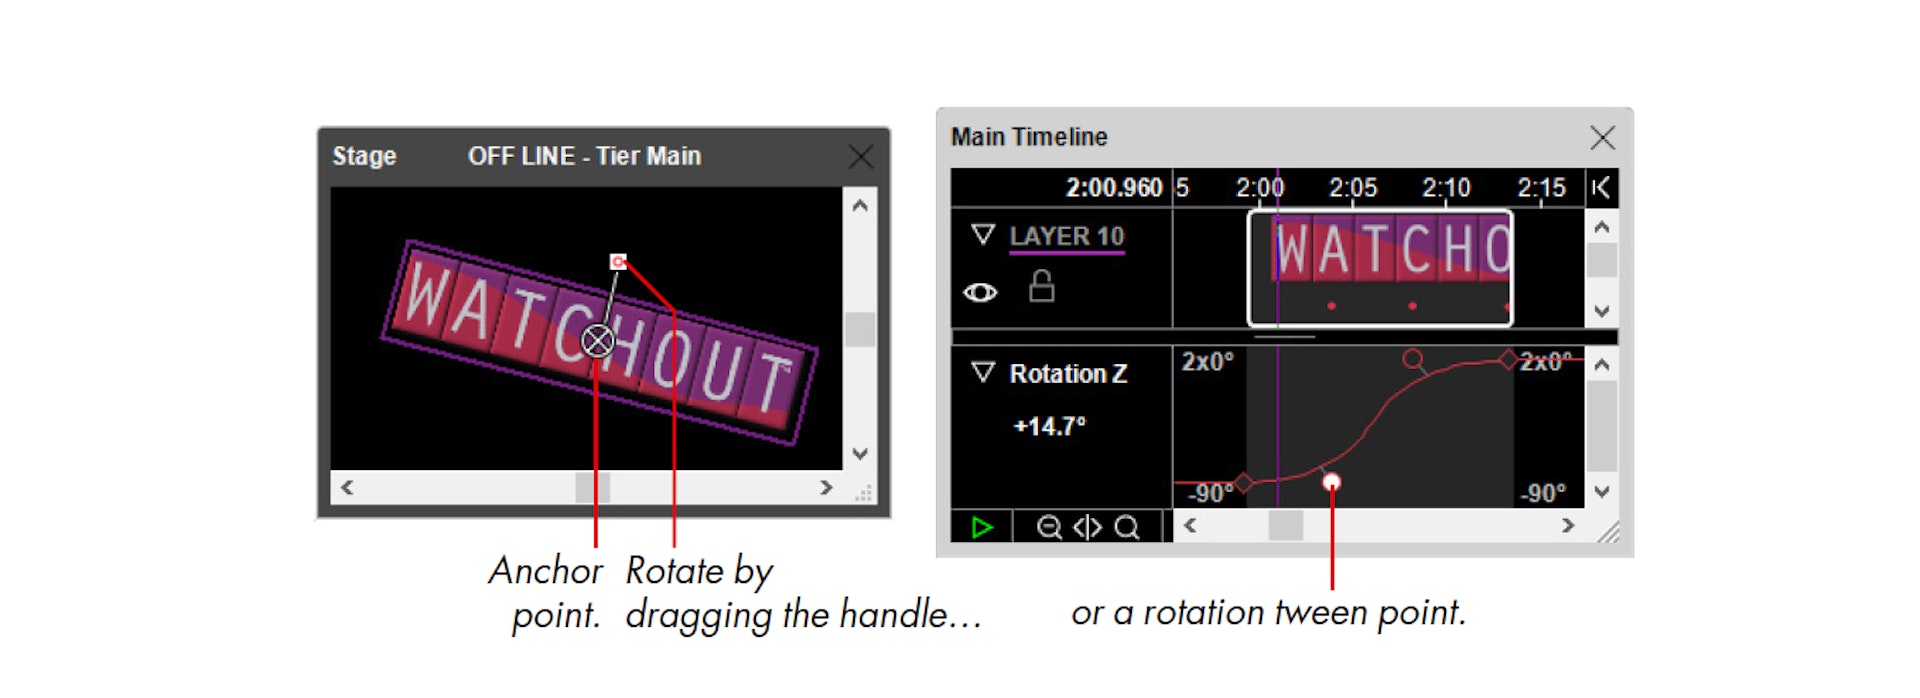
HINT: Click the disclosure triangle in the layer header to expand the layer. This reveals where tweenpoints are located using colored dots along the bottom of cues, as shown above. These dots show you where tween points are used without having to select each individual cue.
Most tween track types apply to images, compositions and video. Volume and Balance apply to movies and audio media. 3D models support only Position, Scale and Rotation. However, you can apply any tween track for images used to create textures for 3D models by using a Virtual Display to manage the texture.
These videos provide an introduction to some of the tween tracks:
The following pages describe each kind of tween track, as well as the dialog boxes accessed by double-clicking a point along a tween track.
Copying and Pasting Tweens
Entire tween tracks, or individual tween points, can be copied in one cue and pasted into one or more other cues. Select entire tracks by clicking their name to the left in the tween pane.
External Control of Tween Tracks
Most parameters can be controlled by external inputs, or by a combination of tween track and external input. Those are indicated by a formula button, as shown in the illustration above. See also “External Control of Position, Rotation and Scale” as well as “Controlling Tween Tracks”.
Position
Positions an image on stage. To change the position, drag the image or one of the motion path handles shown in the Stage window when the cue is selected. To set the position numerically, double-click the Position tween point and type the desired position of the anchor point into the “Location” field.
HINT: To move the entire motion path, first select all the Position tween points, then drag the image. Or use the Move command on the Edit menu.
The “Speed” fields control the speed of motion into or out from the point. A value of 1 results in the normalspeed required to move linearly to the next point. Smaller values make the image go slower and greater values go faster. The speed is indicated by white dots along the motion path (see below), and can also be controlled using the speed handles (visible only for smooth points).
Using the Z position field, you can move the image along the Z axis, away from or towards the viewer. The Z position can also be controlled by dragging the Position tween point vertically, with the position indicated numerically next to the tween track. Moving the image along the Z axis changes its perceived size according to the amount of perspective selected in the Preferences dialog box. When images move away from the viewer, they move toward the vanishing point, which is also set in the Preferences dialog box (see “3D Perspective and Stereoscopy”).
Normally, images overlap and obscure each other according to their layer order. When using Z position, you may want images closer to the viewer to obscure images farther away. If so, select “By Z-Depth” in the cue’s specifications (see “Stacking”).
When positioning images along the Z axis, it may be hard to see where the image is when viewed from the front. If so, choose “View, Left” or “View, Top” on the Stage menu to rotate the stage preview. These views also allow you to edit the Z position by dragging the image or its position tween points in the Stage window.
HINT: In some cases, it may be easier to edit the position of an image in the Stage window by first deselecting Perspective on the preview menu.

The “Smooth” checkboxes allow you to create curved motion paths, as shown below. When selected, a direction handle appears attached to the point, controlling the direction of motion into or out from the point.
Link Handles
Select “Link Handles” to make sure that the motion through a tween point is perfectly smooth. When selected, the directional handles on either side of the point are linked so they always point in opposite directions. This option is not available for the beginning and end points.

Scale
Scales an image in relation to its anchor position (see “Anchor Position”). You can specify either the scale factor (relative to the image’s natural size), or the desired size of the image on stage. Negative values flip the image.
The “Smooth” checkbox allows you to change a corner point into a smooth point, and vice versa. A smooth point changes the rate of scaling over time, for example making it start or stop in a more gradual and less abrupt way.
As an alternative to using the Scale tween track handle or its dialog box, simply drag the scaling handle appearing in the Stage window. Press Shift to maintain the image’s proportions as you drag.
To scale the width and height by different values, first uncheck the “Maintain Proportions” checkbox. This results in a split scale curve, allowing you to adjust horizontal and vertical scaling independently


Crop
Use a Crop tween track to move the edges of an image inwards. You can use this to remove unwanted parts of an image, or as a creative effect to make text or other elements appear gradually.
HINT: To specify a precise amount, double-click a tween point and enter the value as a percentage or in pixels.
As an alternative, use a Wipe tween track to reveal an image using a feathered edge.
Offsets the four corners of an image individually, allowing it to be mapped onto another image or real-world object. As the corners are moved, the image changes accordingly to obtain a matching perspective (see below). While this alters the perceived perspective of the image, the image remains flat (2D). The corners can be moved either by dragging with the mouse, or by using the arrow keys while holding down the Control key. Add the Shift key for greater increments.
For more advanced mapping applications, such as mapping onto arbitrarily shaped 3D surfaces, use a 3D Model object instead (see “3D Models”) .
HINT: This tween track can also be used to skew the image by moving either the top or right-hand side control points.

Opacity
Controls the opacity (transparency) of an image. To change the opacity, either drag the tween point vertically in the tween track, or double-click it to change its value numerically.
The “Time Position” field specifies the position of the tween point along the timeline. This must be a time within the time span occupied by the cue.
The “Smooth” checkbox allows you to change a corner point into a smooth point, and vice versa. Use smooth points in combination with corner points to accelerate or slow down transitions, as shown in the illustration under Scale.
HINT: The opacity curve is also displayed in the cue’s body, allowing you to see it even when the cue isn’t selected.
Rotation Z
Rotates an image around its anchor point (see “Anchor Position”). You can rotate the image by a specified number of revolutions or degrees, or a combination of the two. (For example, to rotate 2.5 times, set Revolutions to 2 and Degrees to 180.)
Alternatively, drag the rotation handle in the Stage window or the Rotation tween point in the tween pane.
HINT: You can also make an image rotate automatically to orient itself along a motion path (see “Auto-orient along Motion Path”).

Rotatation X and Y
Similar to the Rotation Z tween track described on the previous page, but rotates the image around its X (horizontal) or Y (vertical) axes instead, making it appear in perspective. The amount of perspective applied is specified in the Preferences dialog box (see “3D Perspective and Stereoscopy”).
HINT: To edit the amount of X or Y Rotation interactively in the Stage window, first change the viewpoint using the View command on the Stage menu.
Volume
Controls the volume of audio media and video containing audio. The volume curve is also displayed in the body of a sound cue, allowing you to see the curve even when the cue isn’t selected. When combined with the Channel Volumes tween track described below, the Volume tween track controls the overall volume of the sound file, allowing you to fade all channels together.
NOTE: When a Volume tween track isn’t used, the volume is controlled by a setting in the Preferences dialog box (see “Default Audio Volume”). Setting this to a value of less than100% allows you to use a Volume tween track to boost the volume of individual sounds above this default level.
Balance
Controls the left/right audio channel balance. Applies to audio media and video media containing audio.
Channel Volumes
Provides individual volume control for up to eight channels in the sound file. This is particularly useful when playing multi-channel sound files (that is, files with more than a single stereo pair). This tween track type applies to audio media only.
IMPORTANT: Use WAVE files to play multi-channel audio. Other file formats are not supported.
Key (Green/Blue)
Makes a green or blue background transparent. This is sometimes referred to as a “green screen” or “chromakey” effect, and is typically used with live video, although it can be used with any kind of image. Adjust the Threshold and Contrast parameters for best effect. See this video:
Blue green keyer: https://vimeo.com/134594129
HINT: For non-rectangular video playback, you can often use a pure green or blue background, combined with this tween track, as an alternative to a true alpha channel. This allows you to use more efficient video codecs than QuickTime Animation, such as MPEG-2 or H.264.
Key (Selective)
Makes any specific, pure color transparent. This can, for example, be used to make a black background transparent (sometimes referred to as a “luma keyer”). Select the color using the color swatch, then adjust the Threshold and Softness parameters for the desired effect.
HINT: Use this feature to display Powerpoint slides, fed through a capture card Live Video or a Computer Screen media item, on top of a background produced in WATCHOUT. Specify a suitable background color in the Powerpoint presentation, which is then made transparent using this effect. See this video:
Keep Color
Makes the image mostly monochrome, while retaining a certain color range. First select the color to keep by clicking the color swatch or by adjusting the Hue, Saturation and Brightness tween tracks. Then adjust the Tolerance and Softness until you achieve the desired effect.
RGB Mixer
Re-mixes any amount of the original Red, Green and Blue color components to the Red, Green and Blue color components of the resulting image.
Allows you to re-map the color spectrum of an image, as well as adjusting its color saturation contrast and brightness. See this video for a few examples:
Hue & saturation effect: https://vimeo.com/134593724
Hue
Rotates the color spectrum of the image so that the chosen hue corresponds red in the original image. This can be used for minor color balance adjustments all the way up to color inversion.
Saturation
Adjusts the color saturation.
Gain
Changes the contrast of the image by multiplying all its pixels by the specified amount.
NOTE: This may result in clipping in bright areas. If you only want to change the contrast, use the “Contrast & Brightness” effect instead.
Offset
Changes the brightness of the image by adding the chosen amount to its pixels.
HINT: You can invert the image by setting the Gain to -100% and Offset to 100%.
Contrast & Brightness
Adjusts the contrast and brightness of the image. This effect uses a spline curve to adjust these values, similar to how you may use the “Curves” command in Photoshop, thereby avoiding clipping in bright or dark areas.
Color
Use a Color tween track to specify the overall color of an image. The colors in the image will be multiplied by the color you choose. You can think of the Color tween track as the color of a light source illuminating the image. Normally, the color of this light source is white. By changing the brightness or color of this light source, you can influence the overall brightness or color of the image.
Start by selecting an image cue on the timeline and choosing “Color” on the Tween menu to add the tween track. The default color is white, as indicated by the small color swatch next to the tween track name. Click this swatch to change the color.

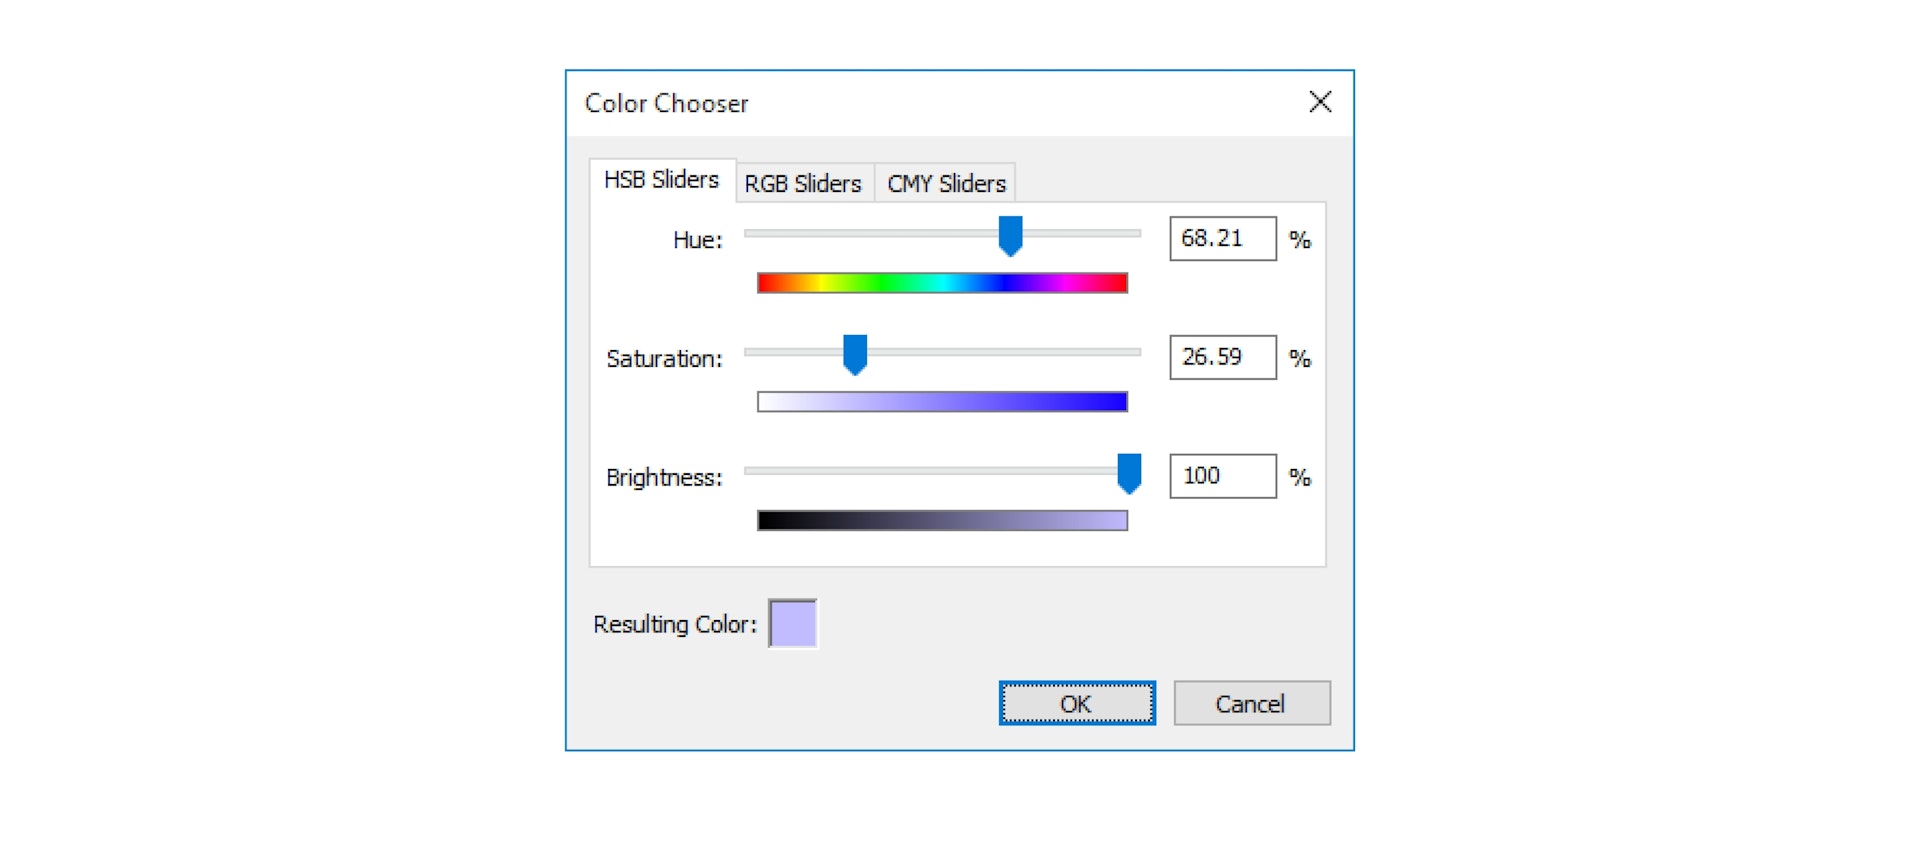
This brings up a dialog box allowing you to specify the color. Choose among the following color models:
HSB. Specifies the color by first picking a hue (a specific color) and then the saturation (the amount of that color) and brightness of the color. This intuitive color model is familiar to many artists and painters.
RGB. Specifies the color using an additive method based on the amount of the three primary colors Red, Green and Blue. This color model is often familiar to users with a web or computer background.
CMY. Specifies the color using a subtractive method, where you specify the filter density of an imaginative set of Cyan, Magenta and Yellow filters. This model may be familiar to you if you come from a lighting background, where filters are often used to control the color of a light.
NOTE: It doesn’t matter which of the three methods you use to specify the color. Use the method that feels most familiar to you.
When using the HSB model, note that merely changing the Hue has no effect unless you also specify a saturation and brightness greater than zero. Watch the “Resulting Color” swatch as you drag the sliders to see the resulting color. The preview in the Status window shows the color as applied to the image.
An alternative way of specifying the color is to open the Color tween track to reveal its sub-tracks.
HINT: Double-click a tween point to set its value numerically. As the hue is specified by its color wheel angle, you can use this method to create rainbow cycles by making the hue go through several revolutions.
Tint
Use a Tint tween track to add color to an image. You can think of the Tint tween track as specifying the color of translucent spray paint added to the image. While the Color tween track primarily affects the bright areas of the image, the Tint tween track mainly affects the dark areas. Normally, the Tint color is black, meaning that no color is added.
HINT: You can combine both Color and Tint on the same image.
Specify the color to be added using the same methods as described above for the Color tween track.
Black & White
Makes the image monochrome based on the color chosen in the Hue and Saturation parameters. Adjust the Mix parameter to restore some amount of the original color, if desired. See this video for an example:
Black & white effect: https://vimeo.com/134593725
HINT: The “Black &White” effect, with a carefully chosen source color, often gives a better result than using the “Hue & Saturation” effect to desaturate the image.
Wipe
The various Wipe effects make an image appear gradually, starting from one edge or corner and progressing towards the other. To see the effect, ramp up the Completion parameter from 0 to 100% over time. Change the Angle parameter to control the direction of the wipe. Adjust other parameters to your liking by changing the parameter while the Completion value is around 50%. See this video for some examples:
Rounded Corners
Applies a corner radius and/or feathered edge to an image. Note that for still images, this tween track is only available when “More Effects and Capabilities” is selected (see “Optimize For”).
HINT: Use this tween track on a Solid, in combination with a Color tween set to black and some Opacity, to create a rectangular shadow.