 Arabic
 Chinese
 French
 German
 Hebrew
 Italian
 Japanese
 Portuguese
 Spanish
File Menu
New
Creates a new presentation, specifying the name and location of the WATCHOUT show. It is generally a good idea to create a new folder for each new show. Store all media related to that show in subfolders of this folder. By keeping the show file and any folders containing its media together like this, WATCHOUT will use relative paths to all media files, making it easier to move the show to another disk, backing it up, etc.
HINT: To re-use objects such as display or projector arrangements, tasks and cues, simply copy them from the old presentation then paste them in the new one.
Open
Opens an existing WATCHOUT presentation. This command also verifies that all media files required by the show are still available. Messages appear in the Message window if anything is amiss
Open Recent
Provides a list of recently-opened presentations. Choosing an item from the sub-menu opens the selected presentation.
Save
Saves the presentation that is currently open.
Save A Copy As
Saves a copy of the presentation that is currently open. This is useful for saving backup copies without changing the name of the current presentation.
NOTE: Opening and using such a copy without changing it back to its original name will cause a new set of media to be downloaded to all display computers under the new show name.
Consolidate To
Moves or copies the entire presentation, including its media files, to a folder. You can use this command to consolidate all the relevant files into a folder on a removable drive, regardless of where those files are stored.
This command is also useful if you’ve been using media files stored on numerous servers or disks, or if you want to weed out unused media files intermixed with files actually used in the presentation.
In addition to collecting your media files, this command updates the access paths accordingly in the Media window, and stores this updated copy of the presentation file in the consolidated folder. When using Copy, the old presentation and its media files are not affected.
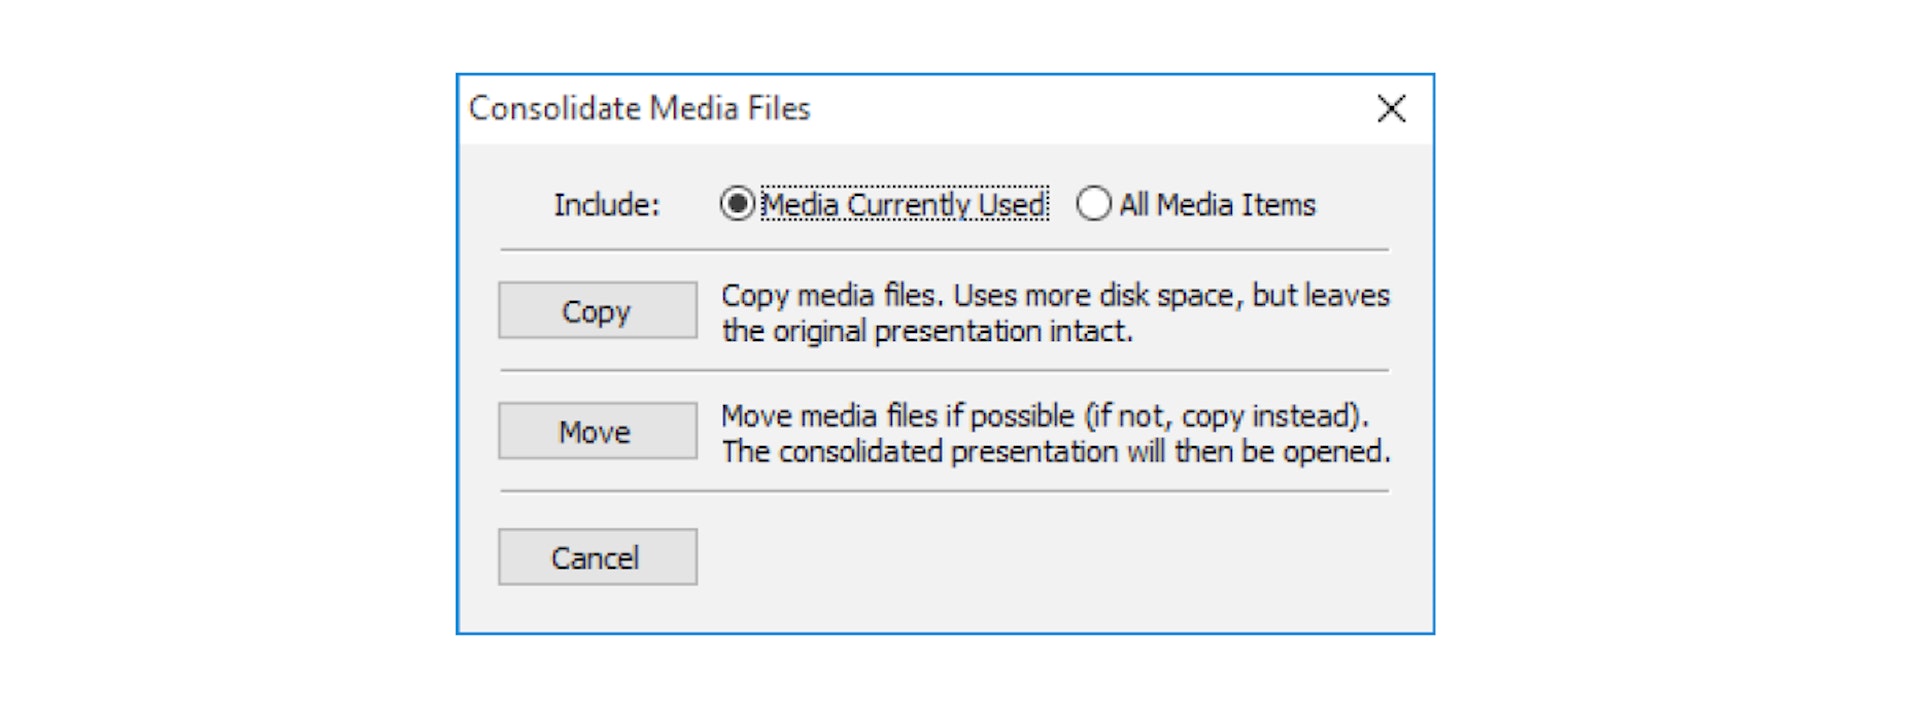
When you use this command, first choose an empty folder for your consolidated presentation. You are then presented with the dialog box shown below and can choose whether to copy or move the media files.
Include. Choose “Media Currently Used” to weed out unused items from the Media window, excluding those from the consolidation (the files will stay where they are). Choose “All Media Items” to include all media items and files listed in the Media window, regardless of whether they are actively used or not.
NOTE: Merely using a media item in a Composition does not count as being actively used, unless said composition is then also used from a timeline. Whenever in doubt, always choose “All Media Items” when consolidating a show.
Copy. Creates a new copy of your presentation, leaving the current media files and the presentation file as they are. This is the safest option, but may require more time and disk space, since it entails making new copies of the media files.
IMPORTANT: When choosing “Media Currently Used”, any unused media items (including compositions) are removed from the Media window in the consolidated version of the show. Unused media files are left in their old locations, and are not copied or moved.
Move. Instead of copying them, this moves all actively used media files residing on the same volume as the target folder. This is much faster and requires no additional disk space for files already located on the target volume. Media files residing on other disks, partitions or servers will be copied, however. The consolidated presentation is then opened automatically.
IMPORTANT: Since the Move option moves media files away from the locations specified in the original presentation, you will no longer be able to use the old presentation file. A new copy of the presentation file is created in the consolidated folder with the updated media file references.
Auto Save
Activates/deactivates the auto save function. This can also be done in the Preferences dialog.
With this functionality activated, your show is saved automatically with a predetermined time interval. The interval may also be set in the Preferences dialog. Auto-saved files are stored in a special folder, with the same name as your show file followed by a “_autosave” suffix.
If you accidently quit WATCHOUT without saving or there is a system failure, there may be a newer version of the show file stored in the auto save folder. If that is the case, the next time you open that show file you will be prompted to choose whether you want to load the newer auto-saved file instead.
Export Bundle for WATCHNET
Saves the entire show, including all its media and other details, to a “WATCHOUT Bundle” file (with file extension WOB). This file can subsequently be imported into WATCHNET for deployment onto clusters managed by a WATCHNET server.
NOTE: A WOB file can not be read back into WATCHOUT. It’s intended for use with WATCHNET only. If you want to archive a show, use the “Consolidate To” command instead.
Export Bundle Update
Creates a bundle update file, containing only the changes made to a show since a specific “WATCHOUT Bundle” file was exported – referred to as the base bundle for the update. The new bundle update file, with file extension WOBU, can then be imported to a WATCHNET server that already has the base-bundle file.
Since the bundle update file contains only the changes relative to its base bundle, it is generally much smaller, making it faster and easier to deploy to a WATCHNET server. When exporting a bundle update, you must select an existing WOB file containing an earlier version of the show you’re exporting. The new bundle update file has the same initial name as the WOB file upon which it is based, plus a time stamp acting as its version number.
IMPORTANT: A bundle update file can only be used by a WATCHNET server that already has the bundle file on which it is based. The update file only contains the differences between the old and new show versions and can not be used on its own.
Export Movie
Exports the main timeline of your show as a QuickTime movie. The movie file can then be sent off for client approval, posted to a web site, or similar.
NOTE: Before choosing this command, set up the Stage window to define the scale and area to be exported. Only the displays currently visible in the Stage window will be exported. This can be used to export a smaller portion of a very large stage. Areas outside the displays that are currently visible in the Stage window will be cropped or blanked out in the resulting file. Also, if your show uses conditional layers, set the desired set of layer conditions in the Preferences box before exporting.
When you choose the “Export Movie” command, a Save dialog will be shown, allowing you to name the resulting movie file. This dialog box also allows you to limit which part of the timeline to export, and to control the compression being used. The formats available may vary depending on the version of Quicktime you have installed.
NOTE: This command requires QuickTime installed on your production computer.
Exporting an Auxiliary timeline
To export an auxiliary timeline, first open and select its window, then choose “Export Movie” on the File menu.

Export Audio
Exports a stereo mix-down of the audio from the main timeline of your show, as a WAVE-file.
Quit
Quits WATCHOUT after optionally saving any changes.
Preferences
Allows you to specify miscellaneous settings of the presentation.
NOTE: These settings are stored with the presentation, and do not apply to other shows made on the same production computer.

Display Cluster Name
Specifies the name of the display cluster. This is useful when you have multiple clusters on the same network, especially when several clusters have the same configuration of displays, and you’re using computer names, rather than IP addresses, to specify display computers.
NOTE: A “display cluster” refers to a set of displays that work together to present a single show. Often, you have only a single cluster on your local network, in which case naming is not necessary. However, in some cases – particularly in fixed installations – you may have several independent display clusters on the same network, all updated from a single production computer, or using Dataton WATCHNET.
Display IP Number Prefix
When using fixed IP addresses for display computers, the IP addresses usually only differ in the last few digits (see illustration under “Network”). By entering the common initial part in this field, you then only have to enter the last few digits into the specifications dialog box of each individual display.
IMPORTANT: You must enter the period that separates the last two groups of digits here. The complete IP address is made by simply combining the contents of the “Display Address Prefix” field with the contents of the display’s Computer field.
Display Framerate
Specifies the frame-rate used by the display computers. This setting lets WATCHOUT optimize its behavior to match the frame-rate of any video being used in the presentation, as well as the display devices. Your display computers should use a matching refresh rate (see “Display Properties”).
Standby Rates
Specifies the fade out and fade in rates for the standby command (see “Standby”).
Default Image Duration
Display duration used for new image cues added to timelines. You change the duration of cues by dragging either end of the cue.
Default Audio Volume
Volume level used to play audio not governed by a Volume tween track. Set this to a value below 100% to provide for some additional headroom when controlling the playback volume.
Center Anchor Position
When checked, the anchor point will be aligned with the center of the image as you drag an image to a timeline or the Stage window (see “Anchor Position”).
Edge Blend
Drag the round dot to adjust the edge blend curve. It is possible to add more points to the curve, but this is generally not required. The same curve is applied to all edges. The left of the curve corresponds to the outer (dark) edge of the gradient. Your display computers must be online for you to see the effect of the edge blend curve while changing it.
IMPORTANT: Before attempting to adjust the edge blend curve, make sure your projectors are set up properly. If not, it may be impossible to get a proper edge blend.
Double-click a point to view and edit its value numerically, or to change its type. This also allows you to copy the edge blend curve from one presentation to another.
HINT: Enlarge the window for better precision in adjusting the curve.

Overriding the Global Edge Blend
As an advanced alternative, you can disable the default edge blending on a per-display basis. This is done in the Advanced tab of the Display Settings dialog box. You can add individual edge masks using the Mask tab of the Display Settings dialog box, allowing you to control all aspects individually. However, in the vast majority of cases this is not required when using reasonably matched and calibrated projectors.
Control
This tab provides various options for external control of the WATCHOUT production software.
NOTE: For more control options, see “Inputs”.

Go Online Automatically. When selected, WATCHOUT will automatically attempt to connect to the display computers when opening this show.
Production Computer Control (TCP and UDP). Activates external control of the WATCHOUT production software. This allows you to control your WATCHOUT presentation from a touch panel or other computers and control systems. The control protocol has provisions for positioning, starting and stopping the presentation, as well as other miscellaneous functions. See Controlling the Production Software.
NOTE: This control feature is not to be confused with the display cluster control capability, described under Control Protocol. While they both perform similar functions, one controls the production computer and the other controls the display computers directly, without the need for any production computer being present during playback.
Timecode Control of Main Timeline. Enables synchronization of the main timeline of the production software by an external timecode signal. When selected, specify which audio device will be used for timecode, the format of the expected timecode as well as any offset to be added to the external timecode to make it match up with the timeline. Use a negative offset if the external timecode specifies a later time position.
MIDI Show Control. Enables control of WATCHOUT using the MIDI Show Control protocol, available in many lighting consoles. See the appendix titled MIDI Show Control for details on the various options.
DMX-512 Universe. Specifies the Artnet protocol “universe” number to be used to receive and transmit DMX-512 data. This relates to the DMX-512 Input and Output respectively. See DMX-512 Input for more details on how to use DMX-512.
Default Dynamic Image Server Address. The default server address used by Dynamic Image media items, if not specified explicitly (see “Add Dynamic Image”).
Realtime Tracking. Specifies settings for a realtime tracking system to be used in conjunction with WATCHOUT. The tracking system sends it data on a multicast network address that may be specified together with its corresponding network port. It is also possible to set system-wide scaling for the data received from the tracking system. Please see the appendix titled “E. TRACKING INPUT” for details on how to incorporate realtime tracking into your show.
Enabled Layer Conditions. Specifies which layer conditions will be enabled. Each layer in the Timeline window can be associated with a condition, in which case media on that layer will only appear when the corresponding condition is enabled (see “Condition”). You can specify any combination of conditions.
Layer conditions are particularly useful together with external control of display clusters, (see "Control Protocol").
NOTE: The Stage window normally previews media from enabled layers only. This behavior is governed by options on the “Preview” menu.
Video In
Associates video input cards in the production computer with video input device numbers, subsequently used in “Live Video” media. This allows you to view live video in the production computer, if desired. It serves the same purpose in the production computer as the “Video In” menu does in the display software (see illustration under “Add Live Video”).
NOTE: The “Video In” settings in the Preferences dialog box apply only to the production computer. Each display computer has its own, independent assignment of video input devices. This allows you to have different configurations of capture cards in the various computers.
If you don’t want to preview live video in the production computer’s Stage window, choose the “Thumbnail” stage preview mode in the “Live Video” media item. Doing so still allows you to assign video input device numbers for use in the display computers, while disregarding any setting for the corresponding video input device number in the production software. In this case, you can ignore the settings in the “Video In” section of the Preferences dialog box.
Audio Out
Associates audio output channel pairs in the production computer with audio output channel numbers, subsequently used in the “Output Channel Assignment” tab of a Sound cue (see “Sound Cue Specifications”). This allows you to play multi-channel audio through the production computer, if desired.
NOTE: The “Audio Out” settings in the Preferences dialog box apply only to the production computer. Each display computer has its own, independent assignment of audio output channel. This is accessed through the “Audio Out” menu shown by pressing Ctrl-W on a display computer (see “Sound”).
3D Perspective and Stereoscopy
These settings control the perspective of images and 3D objects rotated or moved in 3D space.
3D Perspective and Stereoscopy
These settings control the perspective of images and 3D objects rotated or moved in 3D space.
Vanishing Point. As images move away from the viewer along the Z axis, they move towards the vanishing point. In general, you want this point to be at the center of the stage, which can be accomplished by clicking the Center button. You can also enter the coordinate of the vanishing point manually. The position of the vanishing point is indicated by a symbol in the Stage window, displayed only while editing the settings in the Preferences dialog box.

Perspective. Images rotated around the X or Y axes appear distorted according to the perspective. A smaller value results in a more exaggerated perspective. You may think of this value as controlling the focal length of a lens used to view the images, where a wide angle lens (smaller value) results in a more pronounced perspective. This value also controls the degree to which images moved along the Z axis (towards or away from the viewer) change their apparent size.
HINT: Sometimes, the perspective effect can make it harder to edit the position and orientation of images in the Stage window. If so, turn off the perspective using the Perspective command. That command affects the preview only – not images displayed on screen.
Eye Distance. When displaying images using stereoscopic projection, this setting controls the amount of left/right image separation that’s applied as a function of the distance from the zero parallax plane (i.e., the screen). Depending on the physical size of the screen used to view the presentation, you may need to adjust this value. For comfortable viewing, the left/right separation should not exceed 60 mm on screen (approximately 2.4 inches).
IMPORTANT: This setting has no effect on stereoscopic video being used in your presentation, as the eye separation has already been baked into the video itself. Attempt to keep the amount of physical eye separation of stereoscopic video within the same limits as other stereoscopic images, as mentioned above.
Cue Colors
This tab enables you to select default cue colors for the various types of media cues available in WATCHOUT. Hover the mouse over one of the labels to display a small informational text about which cue types are affected by that default cue color.
Click a color indicator next to a label to bring up a color selection dialog in which a new default color may be selected.
